ThinkDiffusion Help Docs
  • Getting Started
    • Welcome to ThinkDiffusion
      • Product Architecture
      • Open-source vs Closed-source
    • Quick Onboarding
    • Explore Apps & Models
    • Resources
    • For Beginners
      • Page
  • AI ART VIDEO MODELS & APPS
    • Automatic1111 in the Cloud
      • Intro to StableDiffusion Course for Beginners
        • Chapter 1: Stable Diffusion intro
        • Chapter 2: Stable Diffusion UI
        • Chapter 3: Your First Image in Automatic1111
        • Chapter 4: Stable Diffusion LoRAs
        • Chapter 5: Automatic1111 Img2Img
      • How to upload a model in Automatic1111
      • How to use LORA's in Automatic1111
      • How to use a textual inversion embedding in Automatic1111
      • How to view and test Automatic1111 API
      • How to use extensions in Automatic1111
      • How to load your Deforum Settings in Automatic1111
      • How to use an init image in Automatic1111
      • How to add more ControlNet models in Automatic1111
      • How to create a Hypernetwork in Automatic1111
      • Automatic1111 Frequently Asked Questions
    • ComfyUI in the Cloud
      • Intro to ComfyUI Course for Beginners & Pros
        • Chapter 1: ComfyUI interface
        • Chapter 2: ComfyUI fundamentals
        • Chapter 3: ComfyUI Workflows
        • Chapter 4: ComfyUI Settings
        • Chapter 5: ComfyUI KSampler
        • Chapter 6: ComfyUI Denoising
      • Download ComfyUI Workflows
      • How to upload a model in ComfyUI
      • How to generate your first AI image with Flux in ComfyUI
      • How to Install Custom Nodes in ComfyUI
    • Wan 2.1 in the Cloud
      • How to run Wan 2.1 in ComfyUI for ImagetoVideo Generation
  • Fooocus in the Cloud
  • Kohya in the Cloud
  • Forge in the Cloud
  • THINKDIFFUSION WALKTHROUGH
    • Private and secure machines
    • File Management
      • Navigate your files
      • File Storage & Uploads
    • Installing Custom Nodes in ComfyUI
    • How to Upload Models
    • How to contact support
  • ThinkDiffusion FAQs
  • TROUBLESHOOTING
    • How To Access Logs In ThinkDiffusion
    • My ComfyUI workflow is failing. How do I fix it?
    • Troubleshooting FAQs
  • THINKDIFFUSION EDU / TEAMS
    • EDU / Teams Commonly Asked
Powered by GitBook
On this page
  • How to upload a file from your device
  • How to upload a model by URL ( eg Civitai )
  • How to upload from Google Drive

Was this helpful?

  1. AI ART VIDEO MODELS & APPS
  2. ComfyUI in the Cloud

How to upload a model in ComfyUI

PreviousDownload ComfyUI WorkflowsNextHow to generate your first AI image with Flux in ComfyUI

Last updated 22 days ago

Was this helpful?

Uploading into ComfyUI through our file browser is exactly the same as you would through A1111 - see . Basically:

  • In My Files, navigate to the correct folder.

  • And click upload to reveal the URL field for your URL.

The important step is navigating to the correct folder depending on the type of model you're uploading.

Navigate to: / comfyui / models /

You'll see that Checkpoints, ControlNet Models, LoRAs, LyCORIS', VAEs, and Hypernetworks all have their corresponding and designated subfolder within the models folder.

Choose the subfolder that matches the file type you're uploading. In the example below, we will:

  • (1) Navigate to the /checkpoints/ subfolder to upload a checkpoint file.

  • (2) Paste the URL of your file into the upload field.

You'll see your newly uploaded model show up below in the file area.

Learn how to find the URL of the file you're uploading

Click on RESTART UI so ComfyUI refreshes its model listing. Sometimes Comfy requires you to refresh the browser.

How to upload a file from your device

To upload a file or image, open your My Files panel

Then simply click the ⬆️ Upload button to reveal the drag & drop/upload area, and tap the area to upload the file of your choice.


How to upload a model by URL ( eg Civitai )

  1. On Thinkdiffusion, navigate to the appropriate folder, first. Your uploads will be placed in that file path.

  • For example, to upload a custom checkpoint model by URL, open your My Files panel, and navigate to the following folder: ../user_data/a1111/models/Stable-Diffusion/

  • If you're uploading a custom LoRA, the path would would be: ../user_data/a1111/models/Lora

2. Click the ⬆️ Upload button to reveal the upload field

3. Paste in the URL of your choosing. The URL can be from Civitai, huggingface, or any other URL hosting the files.

Find the correct link to right-click on Civitai:

Find the correct link to right-click on Huggingface:

4. Hit the 🔄 Refresh button next to the appropriate models list (if applicable) and Voila! 🪄✨


How to upload from Google Drive

Uploading files with a direct google drive link is as easy as pasting the URL of the file into the URL field.

It’s GETTING the link from Google that’s the tricky part, due to their security checks. In the future, we’ll be implementing a solution for this, and in the meantime you can take the steps below:

⚡️Protip: First confirm your file is publicly available with the link, so that "Anyone with the link" can access the file.

1. "Copy link" from Google drive

  • It would look something like this: https://drive.google.com/file/d/1p66tMx0YhzXfzIxlupa8Oaqp-BJZA0Rf/view?usp=drive_link

2. Convert the Google Drive public URL to a fully downloadable link

  • You can use the format: https://drive.google.com/uc?export=download&id=YOUR_FILE_ID

3. Replace “YOUR_FILE_ID” with the actual file ID from your Google Drive URL.

  • In this example, the file ID is 1p66tMx0YhzXfzIxlupa8Oaqp-BJZA0Rf so the fully downloadable link would be: https://drive.google.com/uc?export=download&id=1p66tMx0YhzXfzIxlupa8Oaqp-BJZA0Rf


Important: If your file is too large, Google drive will present you with this confirmation:

You then need to follow these steps below to get the correct URL:

1. Go to Inspect mode with a right click & Inspect (or F12 button on Windows).

2. Select the Network tab

3. Click on the "Download anyway" button, then click Cancel when the download window pops up.

4. Click on the "uc?id=......" in the Name column on the left.

5. Click on the "Headers" Sub tab

6. Copy the Request URL ( which you can find in the: Network Tab > Headers Sub tab > Request URL )

The Request URL is the fully downloadable URL to your file. Now you can FINALLY paste THAT into the Think Diffusion Upload via URL field!

You can also upload with a single URL via or from file sharing services like .

Find the correct link to right-click on Civitai. You can also use the big download button on the top of the model's page, but when there are multiple files offered, you'll be able to choose individual files from this area.
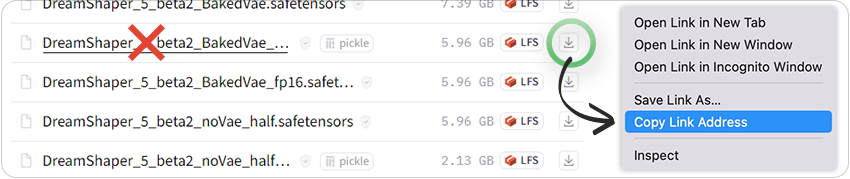
Find the correct link to right-click on Huggingface with the download icon, NOT the model's name.
Sites like Civitai
Google Drive
those instructions above
upload in progress, 0