How to Upload Models

How to upload a file from your device

To upload a file or image, open your My Files panel

Then simply click the ⬆️ Upload button to reveal the drag & drop/upload area, and tap the area to upload the file of your choice.

You can also upload with a single URL via Sites like Civitai or from file sharing services like Google Drive.


How to upload a model by URL ( eg Civitai )

  1. On Thinkdiffusion, navigate to the appropriate folder, first. Your uploads will be placed in that file path.

  • For example, to upload a custom checkpoint model by URL, open your My Files panel, and navigate to the following folder: ../user_data/a1111/models/Stable-Diffusion/

  • If you're uploading a custom LoRA, the path would would be: ../user_data/a1111/models/Lora

2. Click the ⬆️ Upload button to reveal the upload field

3. Paste in the URL of your choosing. The URL can be from Civitai, huggingface, or any other URL hosting the files.

Find the correct link to right-click on Civitai:

upload in progress, 0
Find the correct link to right-click on Civitai. You can also use the big download button on the top of the model's page, but when there are multiple files offered, you'll be able to choose individual files from this area.

Find the correct link to right-click on Huggingface:

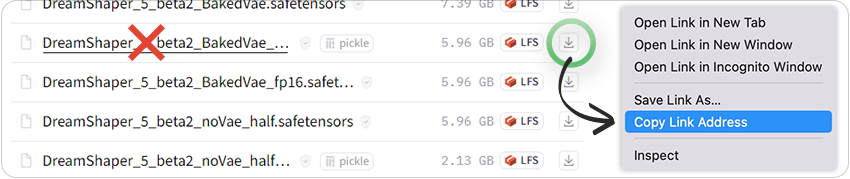
Find the correct link to right-click on Huggingface with the download icon, NOT the model's name.

4. Hit the 🔄 Refresh button next to the appropriate models list (if applicable) and Voila! 🪄✨


How to upload from Google Drive

Uploading files with a direct google drive link is as easy as pasting the URL of the file into the URL field.

It’s GETTING the link from Google that’s the tricky part, due to their security checks. In the future, we’ll be implementing a solution for this, and in the meantime you can take the steps below:

⚡️Protip: First confirm your file is publicly available with the link, so that "Anyone with the link" can access the file.

1. "Copy link" from Google drive

  • It would look something like this: https://drive.google.com/file/d/1p66tMx0YhzXfzIxlupa8Oaqp-BJZA0Rf/view?usp=drive_link

2. Convert the Google Drive public URL to a fully downloadable link

  • You can use the format: https://drive.google.com/uc?export=download&id=YOUR_FILE_ID

3. Replace “YOUR_FILE_ID” with the actual file ID from your Google Drive URL.

  • In this example, the file ID is 1p66tMx0YhzXfzIxlupa8Oaqp-BJZA0Rf so the fully downloadable link would be: https://drive.google.com/uc?export=download&id=1p66tMx0YhzXfzIxlupa8Oaqp-BJZA0Rf


Important: If your file is too large, Google drive will present you with this confirmation:

You then need to follow these steps below to get the correct URL:

1. Go to Inspect mode with a right click & Inspect (or F12 button on Windows).

2. Select the Network tab

3. Click on the "Download anyway" button, then click Cancel when the download window pops up.

4. Click on the "uc?id=......" in the Name column on the left.

5. Click on the "Headers" Sub tab

6. Copy the Request URL ( which you can find in the: Network Tab > Headers Sub tab > Request URL )

The Request URL is the fully downloadable URL to your file. Now you can FINALLY paste THAT into the Think Diffusion Upload via URL field!


How to add persistent models in ComfyUI

Models added through the manager are not retained between sessions. This section outlines how to incorporate various types of models to ensure they persist across different machine sessions.

Here are some typical directories for uploading models and their corresponding mappings:

  • Embeddings - Embeddings can be downloaded and placed under comfyui/models/embeddings e.g. - Useful Quality Embeddings

  • Checkpoints - One can download there checkpoints models and place it under comfyui/models/checkpoints e.g. JuggernautXL

  • Clip_vison - Download your clip vision model and put it under comfyui/models/clip_vision e.g. IPAdapter Models

  • ControlNets - Download your checkpoint model and put it under comfyui/models/ControlNet e.g. Controlnet on huggingface

  • Lora - All the LORA or motion-LORA models must be under comfyui/models/loras e.g. Loras on Civitai

  • VAE - Download your VAE and place it under comfyui/models/VAE e.g. Vae on CivitAI

  • LyCORIS - Download your LyCORIS model and place it under comfyui/models/LyCORIS e.g. Lycoris models on CivitAI

  • ESRGAN - One can download any upscaler model (esrgan) and place it under comfyui/models/ESRGAN e.g. Ultimate ESRGAN Upscalers

Last updated

Was this helpful?