# Welcome to ThinkDiffusion

Create and master AI creative workflows in minutes - not hours. ThinkDiffusion gives you instant cloud  access to powerful open-source tools like **ComfyUI**, **Automatic1111**, **Wan**, **Flux** and more - no installs, no GPUs, no guesswork. \
\
At ThinkDiffusion, our mission is to **make open-source AI accessible and production-ready** for every creative. That means fast workflows, and full freedom to explore, build, and ship.<br>

## Discover ThinkDiffusion <a href="#discover-gitbook" id="discover-gitbook"></a>

<table data-view="cards"><thead><tr><th></th><th data-hidden data-card-cover data-type="files"></th><th data-hidden data-card-target data-type="content-ref"></th></tr></thead><tbody><tr><td><strong>Quick Walkthrough</strong><br><br>Learn about ThinkDiffusion and how to get started with the platform.</td><td><a href="/files/Og8oW5LXw6TypsY2QEOq">/files/Og8oW5LXw6TypsY2QEOq</a></td><td><a href="/pages/O857o2EhjHXna9gfzNQE">/pages/O857o2EhjHXna9gfzNQE</a></td></tr><tr><td><strong>Open-source apps &#x26; models</strong><br><br>Run the latest AI creative models and apps on ThinkDiffusion cloud.<br><br><br></td><td><a href="/files/sjqaRy9TLxcmFA90Er8B">/files/sjqaRy9TLxcmFA90Er8B</a></td><td><a href="/pages/oFuiLKxAsu6WZ9VsA8bT">/pages/oFuiLKxAsu6WZ9VsA8bT</a></td></tr><tr><td><strong>File management &#x26; platform overview</strong><br><br>Understand the files system and learn more about our 24/7 file browser.<br><br><br><br><br><br></td><td><a href="/files/ZWFRvAfGZWPmFQeAlg4B">/files/ZWFRvAfGZWPmFQeAlg4B</a></td><td><a href="/pages/263HRV58V9AmObB6hxdk">/pages/263HRV58V9AmObB6hxdk</a></td></tr><tr><td><strong>Community</strong> <br><br>Join hundreds of other filmmakers, creators, marketers using AI creative workflows. </td><td><a href="/files/d7fGVyNfkBHmvfrtxZB0">/files/d7fGVyNfkBHmvfrtxZB0</a></td><td><a href="/pages/CyH2xJQs9yWJ1S8BYNav">/pages/CyH2xJQs9yWJ1S8BYNav</a></td></tr><tr><td><strong>Tutorials &#x26; Guides</strong><br><br>Learn, download AI creative workflows, and bridge the gap between you and the future.<br><br><br></td><td><a href="/files/H3NWLfs9qedy3j4dZ2eY">/files/H3NWLfs9qedy3j4dZ2eY</a></td><td><a href="/pages/CyH2xJQs9yWJ1S8BYNav">/pages/CyH2xJQs9yWJ1S8BYNav</a></td></tr><tr><td><br><strong>Troubleshooting</strong><br><br>Read commonly encountered issues on some of the top apps. <br><br><br></td><td><a href="/files/8KhijFE5SYbywnSeKfVG">/files/8KhijFE5SYbywnSeKfVG</a></td><td><a href="/pages/9jm97p9gvqAo79naVB8A">/pages/9jm97p9gvqAo79naVB8A</a></td></tr></tbody></table>

{% embed url="<https://drive.google.com/file/d/1ctWY4HNn1JsnW-I9FayWtFoU4Woa-XTo/view?usp=sharing>" fullWidth="false" %}

<a href="https://www.thinkdiffusion.com/select-machine/featured/a1111/current/ultra" class="button primary">Create Now in the Cloud</a>


# Product Architecture

<figure><img src="/files/1ct0DNC9Az7auvONvKRN" alt=""><figcaption></figcaption></figure>


# Platform Overview

## Easy access to the world’s most powerful AI image tools in a few clicks&#x20;

<figure><img src="/files/Bh7Ny6i4h93zjCYuXLsI" alt="" width="563"><figcaption></figcaption></figure>


# Open-source vs Closed-source

<figure><img src="/files/JrAEugD9rgw04fEpQayZ" alt=""><figcaption></figcaption></figure>


# Quick Onboarding

**Welcome to ThinkDiffusion!**\
\
This quick video will walk you through what ThinkDiffusion is, how it works, and how to get started with your first app.

Whether you're generating images with ComfyUI, training a LoRA with Kohya, or experimenting with video workflows - this is your launchpad.\
\
We'll walk you through:

* **Selecting/Launching** your own virtual machine
* **Key features** of the TD platform
* **App overview** of a few popular apps Fooocus/A1111/ComfyUI

{% embed url="<https://vimeo.com/969119339>" %}


# Explore Apps & Models

<table data-view="cards"><thead><tr><th></th><th data-hidden><select></select></th><th data-hidden data-card-cover data-type="files"></th><th data-hidden data-card-target data-type="content-ref"></th><th data-hidden><select></select></th></tr></thead><tbody><tr><td><strong>Automatic1111</strong></td><td></td><td><a href="/files/zprJhnhAXjqZapXCDdSo">/files/zprJhnhAXjqZapXCDdSo</a></td><td><a href="/pages/xXfRVrXhx4GJ4NxJeZON">/pages/xXfRVrXhx4GJ4NxJeZON</a></td><td></td></tr><tr><td><strong>ComfyUI</strong></td><td></td><td><a href="/files/aACOLovSCz6BeIn25e9q">/files/aACOLovSCz6BeIn25e9q</a></td><td><a href="/pages/Ln4HCaK6Rp16tmOukTtj">/pages/Ln4HCaK6Rp16tmOukTtj</a></td><td></td></tr><tr><td><strong>Fooocus</strong></td><td></td><td><a href="/files/CwpjFNzoWx16g6E5Nlrm">/files/CwpjFNzoWx16g6E5Nlrm</a></td><td><a href="/pages/fWA9r1oIQVfCD6Ex9jvY">/pages/fWA9r1oIQVfCD6Ex9jvY</a></td><td></td></tr><tr><td><strong>Forge</strong></td><td></td><td><a href="/files/b8ntfhvfVEsQnKvv4bgp">/files/b8ntfhvfVEsQnKvv4bgp</a></td><td><a href="/pages/EfhxFG1Sw0e3RpBEEdus">/pages/EfhxFG1Sw0e3RpBEEdus</a></td><td></td></tr><tr><td><strong>Kohya</strong></td><td></td><td><a href="/files/h0R0ls3xcGJXJshch81Y">/files/h0R0ls3xcGJXJshch81Y</a></td><td><a href="/pages/6wB1nQhEOZJZ0m5z1axW">/pages/6wB1nQhEOZJZ0m5z1axW</a></td><td></td></tr><tr><td><strong>Wan 2.1</strong></td><td></td><td><a href="/files/dE4ejEc61nwWN48iGo7Y">/files/dE4ejEc61nwWN48iGo7Y</a></td><td><a href="/pages/ixkHb3ngaE0wua3ewDAi">/pages/ixkHb3ngaE0wua3ewDAi</a></td><td></td></tr><tr><td><strong>Flux</strong></td><td></td><td><a href="/files/WdVLTv3G5MvHPbIJVSbt">/files/WdVLTv3G5MvHPbIJVSbt</a></td><td><a href="/pages/KJVZHUi9jIdG67rG5WhH">/pages/KJVZHUi9jIdG67rG5WhH</a></td><td></td></tr></tbody></table>


# Resources

{% stepper %}
{% step %}

### Join our community for tech support & AI Art conversations

[Go here for Discord](https://discord.com/invite/hAm87ApunD)
{% endstep %}

{% step %}

### Ready-to-go workflows curated & created by our team

[Go here for downloadable resources](https://learn.thinkdiffusion.com/)
{% endstep %}

{% step %}

### Step-by-step tutorials for open-source AI Image & Video apps

[Explore and sign-up for our blog](https://learn.thinkdiffusion.com/)
{% endstep %}

{% step %}

### Watch our mini-video series for ComfyUI

[Intro to ComfyUI series](/ai-art-video-models-and-apps/comfyui-in-the-cloud/intro-to-comfyui-course-for-beginners-and-pros)
{% endstep %}

{% step %}

### Watch our mini-video series for Automatic1111

[Intro to Stable Diffusion series](/ai-art-video-models-and-apps/automatic1111-in-the-cloud/intro-to-stablediffusion-course-for-beginners)
{% endstep %}

{% step %}

## Latest app release and updates&#x20;

[Go here for release notes](https://learn.thinkdiffusion.com/release-notes/)
{% endstep %}

{% step %}

### Live webinars and Youtube tutorials&#x20;

[Go here to learn with the team live ](https://www.youtube.com/@ThinkDiffusion)
{% endstep %}
{% endstepper %}


# For Beginners

## Start with our mini-videos series:

<table data-view="cards"><thead><tr><th></th><th data-hidden data-card-cover data-type="files"></th><th data-hidden data-card-target data-type="content-ref"></th></tr></thead><tbody><tr><td><strong>Intro to ComfyUI: Mini-video series by ThinkDiffusion</strong><br><br>Learn about the basics of ComfyUI interface, settings, UI, workflows, and more. </td><td><a href="/files/txlRnFekuWa4UmXDJnWE">/files/txlRnFekuWa4UmXDJnWE</a></td><td><a href="/pages/Ln4HCaK6Rp16tmOukTtj">/pages/Ln4HCaK6Rp16tmOukTtj</a></td></tr><tr><td><strong>Intro to Stable Diffusion: Mini-video series by ThinkDiffusion</strong><br><br>Learn about the basics of Stable Diffusion interface, settings, UI, workflows, and more. </td><td><a href="/files/lITZ2wsop8qPYLX1VHU7">/files/lITZ2wsop8qPYLX1VHU7</a></td><td></td></tr></tbody></table>

## Create your first image with Flux in ComfyUI or with Automatic1111:

<table data-view="cards"><thead><tr><th></th><th data-hidden data-card-cover data-type="files"></th><th data-hidden data-card-target data-type="content-ref"></th></tr></thead><tbody><tr><td><strong>Create your First Image with ComfyUI &#x26; Flux</strong><br><br>- More control with ComfyUI nodes<br>- Learning curve is higher</td><td><a href="/files/LRG0BubkcbmNoSGVlCCf">/files/LRG0BubkcbmNoSGVlCCf</a></td><td><a href="/pages/KJVZHUi9jIdG67rG5WhH">/pages/KJVZHUi9jIdG67rG5WhH</a></td></tr><tr><td><strong>Create your First Image with Automatic1111</strong><br><br>- Easier, faster, lesser control overall</td><td><a href="/files/1KcnHuwUJSLKpajCRnIf">/files/1KcnHuwUJSLKpajCRnIf</a></td><td><a href="/pages/cggxhidwY05zGHHg4fC6">/pages/cggxhidwY05zGHHg4fC6</a></td></tr></tbody></table>

##


# Page


# For Advanced users

### [Top 10 ComfyUI Workflows for AI Text-to-Video and Video-to-Video 2025](https://learn.thinkdiffusion.com/top-10-comfyui-workflows-for-ai-text-to-video-and-video-to-video-2025/)

###


# For Filmmakers

### [Top 10 ComfyUI Workflows for AI Text-to-Video and Video-to-Video 2025](https://learn.thinkdiffusion.com/top-10-comfyui-workflows-for-ai-text-to-video-and-video-to-video-2025/)

###


# Troubleshooting issues

Once you’ve finished writing, editing, or importing your content, you can publish your work to the web as a docs site. Once published, your site will be accessible online only to your selected audience.

You can publish your site and find related settings from your docs site's homepage.

<figure><img src="https://gitbookio.github.io/onboarding-template-images/publish-hero.png" alt=""><figcaption></figcaption></figure>

<table data-view="cards"><thead><tr><th></th></tr></thead><tbody><tr><td></td></tr></tbody></table>

{% tabs %}
{% tab title="First Tab" %}

{% endtab %}

{% tab title="Second Tab" %}

{% endtab %}
{% endtabs %}

<details>

<summary>My ComfyUI workflow is failing. How do I fix it?</summary>

If your ComfyUI workflow isn’t running, it’s usually one of these problems. This page will help you check each one step by step.\ <br>

</details>


# ThinkDiffusion Documentation

At ThinkDiffusion, our mission is to **make open-source AI accessible and production-ready** for every creative.\
That means clear guidance, fast workflows, and full freedom to explore, build, and ship.


# Automatic1111 in the Cloud

Automatic1111 with Stable Diffusion is popular among both beginners and advanced users.

One of the first and most popular user interfaces for Stable Diffusion. It's a feature-rich web UI and offers extensive customization options, support for various models and extensions, and a user-friendly interface.&#x20;

<a href="https://www.thinkdiffusion.com/select-machine/featured/a1111/current/ultra" class="button primary">Run Auto1111 on the Cloud</a>

{% embed url="<https://www.youtube.com/watch?v=dhOxJ6nipuE>" fullWidth="true" %}
Automatic1111 on ThinkDiffusion ft. MDMZ
{% endembed %}

## Tutorials and Guides for Automatic1111

* 20+ [Step-by-step tutorials](https://learn.thinkdiffusion.com/tag/automatic1111/page/2/)
* [Automatic1111 in the Cloud - Everything you need to know](https://learn.thinkdiffusion.com/automatic1111-in-the-cloud-guide/)
* [Amazing animations with AnimateDiff inside ComfyUI](https://learn.thinkdiffusion.com/amazing-animations-with-animatediff-inside-comfyui/)
* [Img2Img in Automatic1111](https://learn.thinkdiffusion.com/img2img-in-automatic1111/)
* [Faceswapping with Reactor](https://learn.thinkdiffusion.com/face-swapping-with-roop/)<br>

<a href="https://www.thinkdiffusion.com/select-machine/featured/a1111/current/ultra" class="button primary">Run Auto1111 on the Cloud</a>

<br>


# Intro to StableDiffusion Course for Beginners

Watch step-by-step guide on how to begin with Stable Diffusion on Automatic1111.

<a href="https://www.thinkdiffusion.com/select-machine/featured/a1111/current/ultra" class="button primary">Run Auto1111 on the Cloud</a>

<table data-view="cards"><thead><tr><th></th><th data-hidden data-card-cover data-type="files"></th><th data-hidden data-card-target data-type="content-ref"></th></tr></thead><tbody><tr><td></td><td><a href="/files/nEK1mkOkWm3yCXWqDGzF">/files/nEK1mkOkWm3yCXWqDGzF</a></td><td><a href="/pages/q12a2hQvu7u4qRJdPFIH">/pages/q12a2hQvu7u4qRJdPFIH</a></td></tr><tr><td></td><td><a href="/files/GjPTEOLQGtVem3Pt7WW8">/files/GjPTEOLQGtVem3Pt7WW8</a></td><td><a href="/pages/7UhOxeA1UomuI5Hn6y3d">/pages/7UhOxeA1UomuI5Hn6y3d</a></td></tr><tr><td></td><td><a href="/files/SLvPPRKsbq0L31VVV4Iv">/files/SLvPPRKsbq0L31VVV4Iv</a></td><td><a href="/pages/cggxhidwY05zGHHg4fC6">/pages/cggxhidwY05zGHHg4fC6</a></td></tr><tr><td></td><td><a href="/files/Qibw2Ed1sTHkI1UVrEji">/files/Qibw2Ed1sTHkI1UVrEji</a></td><td><a href="/pages/UJdYV7N9sTQ7MioWpv6q">/pages/UJdYV7N9sTQ7MioWpv6q</a></td></tr><tr><td></td><td><a href="/files/dffAR7K7M3AGg04S6u69">/files/dffAR7K7M3AGg04S6u69</a></td><td><a href="/pages/MZgwGbUJPrJVI3pR8Cmp">/pages/MZgwGbUJPrJVI3pR8Cmp</a></td></tr></tbody></table>


# Chapter 1: Stable Diffusion intro

{% embed url="<https://drive.google.com/file/d/1ucIIpqNOxWEr9i4NfcXWBfyffmTvUdwj/view?usp=sharing>" %}
Chapter 1: Stable Diffusion intro
{% endembed %}

<a href="https://www.thinkdiffusion.com/select-machine/featured/comfy/beta/ultra" class="button primary">Run ComfyUI on the Cloud</a>


# Chapter 2: Stable Diffusion UI

{% embed url="<https://drive.google.com/file/d/1OTXtsnLzoE3jlaj9iHip42WMxZEv8C_9/view?usp=sharing>" %}

<a href="https://www.thinkdiffusion.com/select-machine/featured/comfy/beta/ultra" class="button primary">Run ComfyUI on the Cloud</a>


# Chapter 3: Your First Image in Automatic1111

{% embed url="<https://drive.google.com/file/d/1FwD1D5U2Yr7hN3YW9aOsWx_6aErZwLJS/view?usp=sharing>" %}

<a href="https://www.thinkdiffusion.com/select-machine/featured/comfy/beta/ultra" class="button primary">Run ComfyUI on the Cloud</a>


# Chapter 4: Stable Diffusion LoRAs

{% embed url="<https://drive.google.com/file/d/1DIiD2nUTwFsftV9Afg7U0gFZAKJnetmf/view?usp=sharing>" %}

<a href="https://www.thinkdiffusion.com/select-machine/featured/comfy/beta/ultra" class="button primary">Run ComfyUI on the Cloud</a>


# Chapter 5: Automatic1111 Img2Img

{% embed url="<https://drive.google.com/file/d/12RdvLMrrplDNhWaEbMITuUFkr5eo4IhQ/view?usp=sharing>" %}

<a href="https://www.thinkdiffusion.com/select-machine/featured/comfy/beta/ultra" class="button primary">Run ComfyUI on the Cloud</a>


# How to upload a model in Automatic1111

## How to upload a file from your device <a href="#how-to-upload-a-file-from-your-device" id="how-to-upload-a-file-from-your-device"></a>

{% embed url="<https://learn.thinkdiffusion.com/content/media/2023/08/UploadFile.mp4>" %}

To upload a file or image, open your **My Files** panel

Then simply **click the ⬆️ Upload button** to reveal the drag & drop/upload area, and tap the area to upload the file of your choice.

You can also upload with a single URL via [Sites like Civitai](https://learn.thinkdiffusion.com/thinkdiffusion-faqs/#how-to-upload-a-model-by-url-eg-civitai) or from file sharing services like [Google Drive](https://learn.thinkdiffusion.com/thinkdiffusion-faqs/#how-to-upload-from-google-drive).

***

## How to upload a model by URL ( eg Civitai ) <a href="#how-to-upload-a-model-by-url-eg-civitai" id="how-to-upload-a-model-by-url-eg-civitai"></a>

1. **On Thinkdiffusion, navigate to the appropriate folder, first.** Your uploads will be placed in that file path.

* For example, to upload a custom checkpoint model by URL, open your **My Files** panel, and navigate to the following folder:\
  *../user\_data/a1111/models/Stable-Diffusion/*

<figure><img src="https://learn.thinkdiffusion.com/content/images/2023/09/image-2.png" alt="" height="85" width="580"><figcaption></figcaption></figure>

* If you're uploading a custom LoRA, the path would would be: *../user\_data/a1111/models/Lora*

<figure><img src="https://learn.thinkdiffusion.com/content/images/2023/09/image.png" alt="" height="84" width="483"><figcaption></figcaption></figure>

**2. Click the ⬆️ Upload button** to reveal the upload field

<figure><img src="https://learn.thinkdiffusion.com/content/images/2023/09/image.jpeg" alt="" height="88" width="328"><figcaption></figcaption></figure>

**3. Paste in the URL** of your choosing. The URL can be from Civitai, huggingface, or any other URL hosting the files.

<figure><img src="https://learn.thinkdiffusion.com/content/images/2023/09/image-1.jpeg" alt="" height="120" width="1016"><figcaption></figcaption></figure>

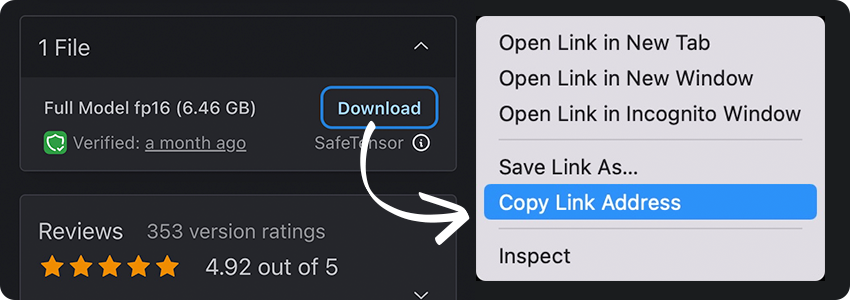
**Find the correct link to right-click on Civitai:**

<figure><img src="https://learn.thinkdiffusion.com/content/images/2023/09/civitai-copy-rounded.png" alt="upload in progress, 0" height="300" width="850"><figcaption><p>Find the correct link to right-click on Civitai. You can also use the big download button on the top of the model's page, but when there are multiple files offered, you'll be able to choose individual files from this area.</p></figcaption></figure>

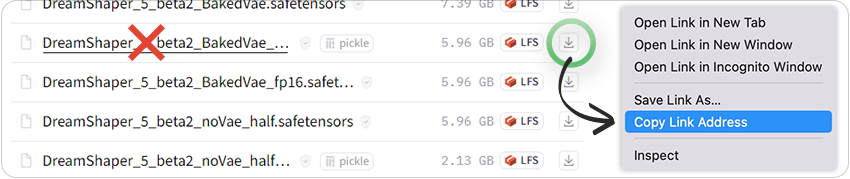
**Find the correct link to right-click on Huggingface:**

<figure><img src="https://learn.thinkdiffusion.com/content/images/2023/09/image-4.png" alt="" height="179" width="850"><figcaption><p>Find the correct link to right-click on Huggingface with the download icon, NOT the model's name. </p></figcaption></figure>

**4.** Hit the 🔄 **Refresh** button next to the appropriate models list (if applicable) and Voila! 🪄✨

***

## How to upload from Google Drive <a href="#how-to-upload-from-google-drive" id="how-to-upload-from-google-drive"></a>

Uploading files with a direct google drive link is as easy as pasting the URL of the file into the URL field.

\
It’s ***GETTING*** the link from Google that’s the tricky part, due to their security checks. In the future, we’ll be implementing a solution for this, and in the meantime you can take the steps below:

**⚡️Protip**: First confirm your file is publicly available with the link, so that "Anyone with the link" can access the file.

<figure><img src="https://learn.thinkdiffusion.com/content/images/2023/09/2023-09-22_9-11-37.png" alt="" height="262" width="541"><figcaption></figcaption></figure>

**1. "Copy link" from Google drive**

* It would look something like this: *<https://drive.google.com/file/d/1p66tMx0YhzXfzIxlupa8Oaqp-BJZA0Rf/view?usp=drive\\_link>*

**2. Convert the Google Drive public URL to a fully downloadable link**

* You can use the format:\
  *<https://drive.google.com/uc?export=download&id=YOUR_FILE_ID>*

**3. Replace “YOUR\_FILE\_ID” with the actual file ID** from your Google Drive URL.

* In this example, the file ID is *1p66tMx0YhzXfzIxlupa8Oaqp-BJZA0Rf*\
  so the fully downloadable link would be:\
  *<https://drive.google.com/uc?export=download&id=1p66tMx0YhzXfzIxlupa8Oaqp-BJZA0Rf>*

***

**Important**: If your file is too large, Google drive will present you with this confirmation:

<figure><img src="https://learn.thinkdiffusion.com/content/images/2023/08/image.jpeg" alt="" height="191" width="686"><figcaption></figcaption></figure>

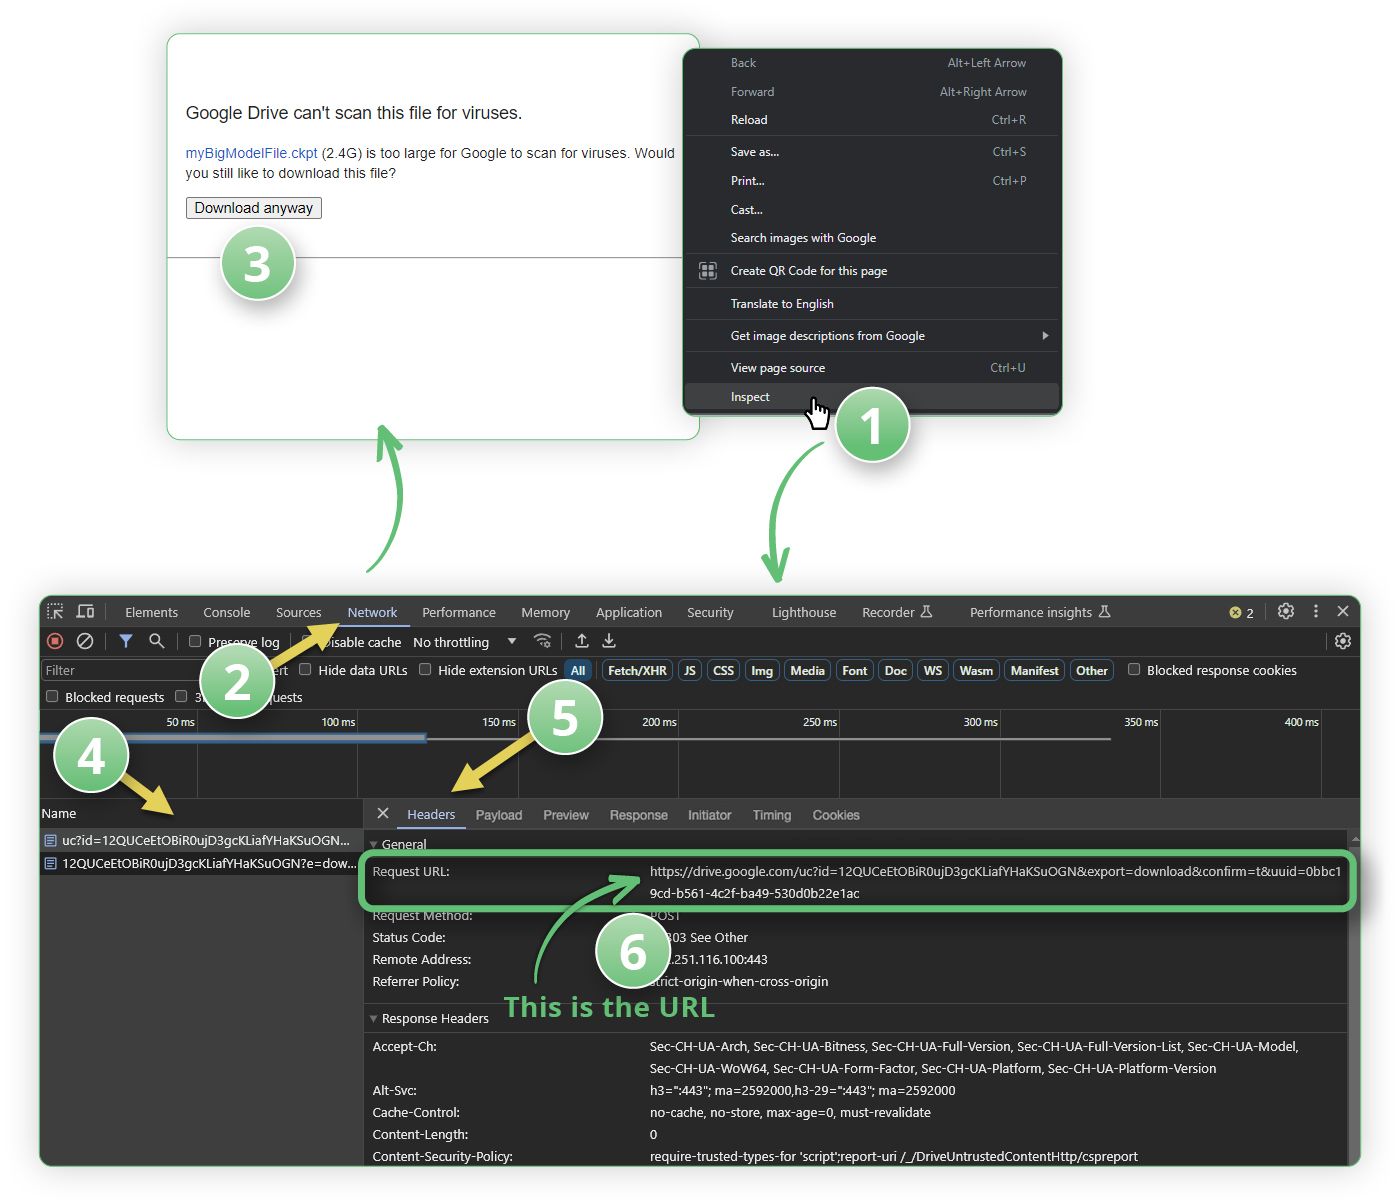
You then need to follow these steps below to get the correct URL:

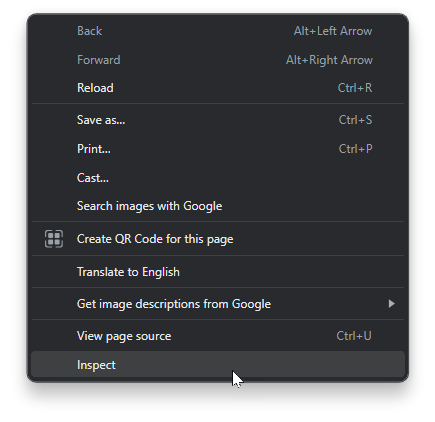
**1. Go to Inspect mode** with a right click & Inspect (or F12 button on Windows).

<figure><img src="https://learn.thinkdiffusion.com/content/images/2023/09/inspect.png" alt="" height="422" width="435"><figcaption></figcaption></figure>

**2. Select the Network tab**

**3**. **Click on the** "**Download anyway"** **button**, then click Cancel when the download window pops up.

**4. Click on the "uc?id=......"** in the Name column on the left.

**5. Click on the "Headers" Sub tab**

**6. Copy the Request URL**\
( which you can find in the: *Network Tab > Headers Sub tab > Request URL )*

The Request URL is the fully downloadable URL to your file. Now you can *FINALLY* paste *THAT* into the Think Diffusion Upload via URL field!

<figure><img src="https://learn.thinkdiffusion.com/content/images/2023/09/google-drive2.jpg" alt="" height="1200" width="1400"><figcaption></figcaption></figure>


# How to use LORA's in Automatic1111

{% embed url="<https://learn.thinkdiffusion.com/content/media/2023/07/Lora.mp4>" %}
How to use LORA's in Automatic1111
{% endembed %}

To use LORA's you need to:

**1. Upload your LORA safetensors file**

* Use the following folder: *../user\_data/a1111/models/Lora/*

**2. Click on the** 🚨**show/hide extra networks icon** when uploaded.

* Head over to the LORA tab and you'll see your LORA file.
* **⚡️Protip:** If for some reason it does not show then **simply click refresh** and your LORA file will appear

**3. To use your LORA**, you simply need to:

* Enter your prompts
* And click on the LORA file and it will add the correct syntax to your prompt as shown below

{% hint style="info" %}
**💡 What does the colon syntax mean? eg. " :1 "**\
\
The :1 at the end of the angled brackets is the weighting of how much of the LORA is applied, so you can change this to 0.5 as an example to weight it less
{% endhint %}

\
Check out out tutorial on creating amazing art with LoRA Models [here](https://learn.thinkdiffusion.com/how-to-use-loras/).<br>


# How to use a textual inversion embedding in Automatic1111

{% hint style="info" %}
Textual inversions can inject new objects and styles into a model, without having to actually change the model. They can be activated by a certain keyword to trigger the textual inversion’s contents to do their magic.
{% endhint %}

{% embed url="<https://learn.thinkdiffusion.com/content/media/2023/08/Load-textual-inversion.mp4>" %}
How to use a textual inversion embedding in Automatic1111
{% endembed %}

**1. Copy the URL** of your favorite textual inversion embedding

**2.** In your files panel, **navigate to your&#x20;*****a1111\embeddings\\*****&#x20;subfolder**

**3.** Click the ⬆️ **upload** icon, **paste the URL** in the address bar, and hit **Submit**

**4.** Hit the 🚨**show/hide** icon to reveal the Textual inversion tab\
( you may have to hit **Refresh** )

**5.** And **click on the embedding thumbnail** to activate it in your prompt field

**What’s so great about textual inversions?**

<br>


# How to view and test Automatic1111 API

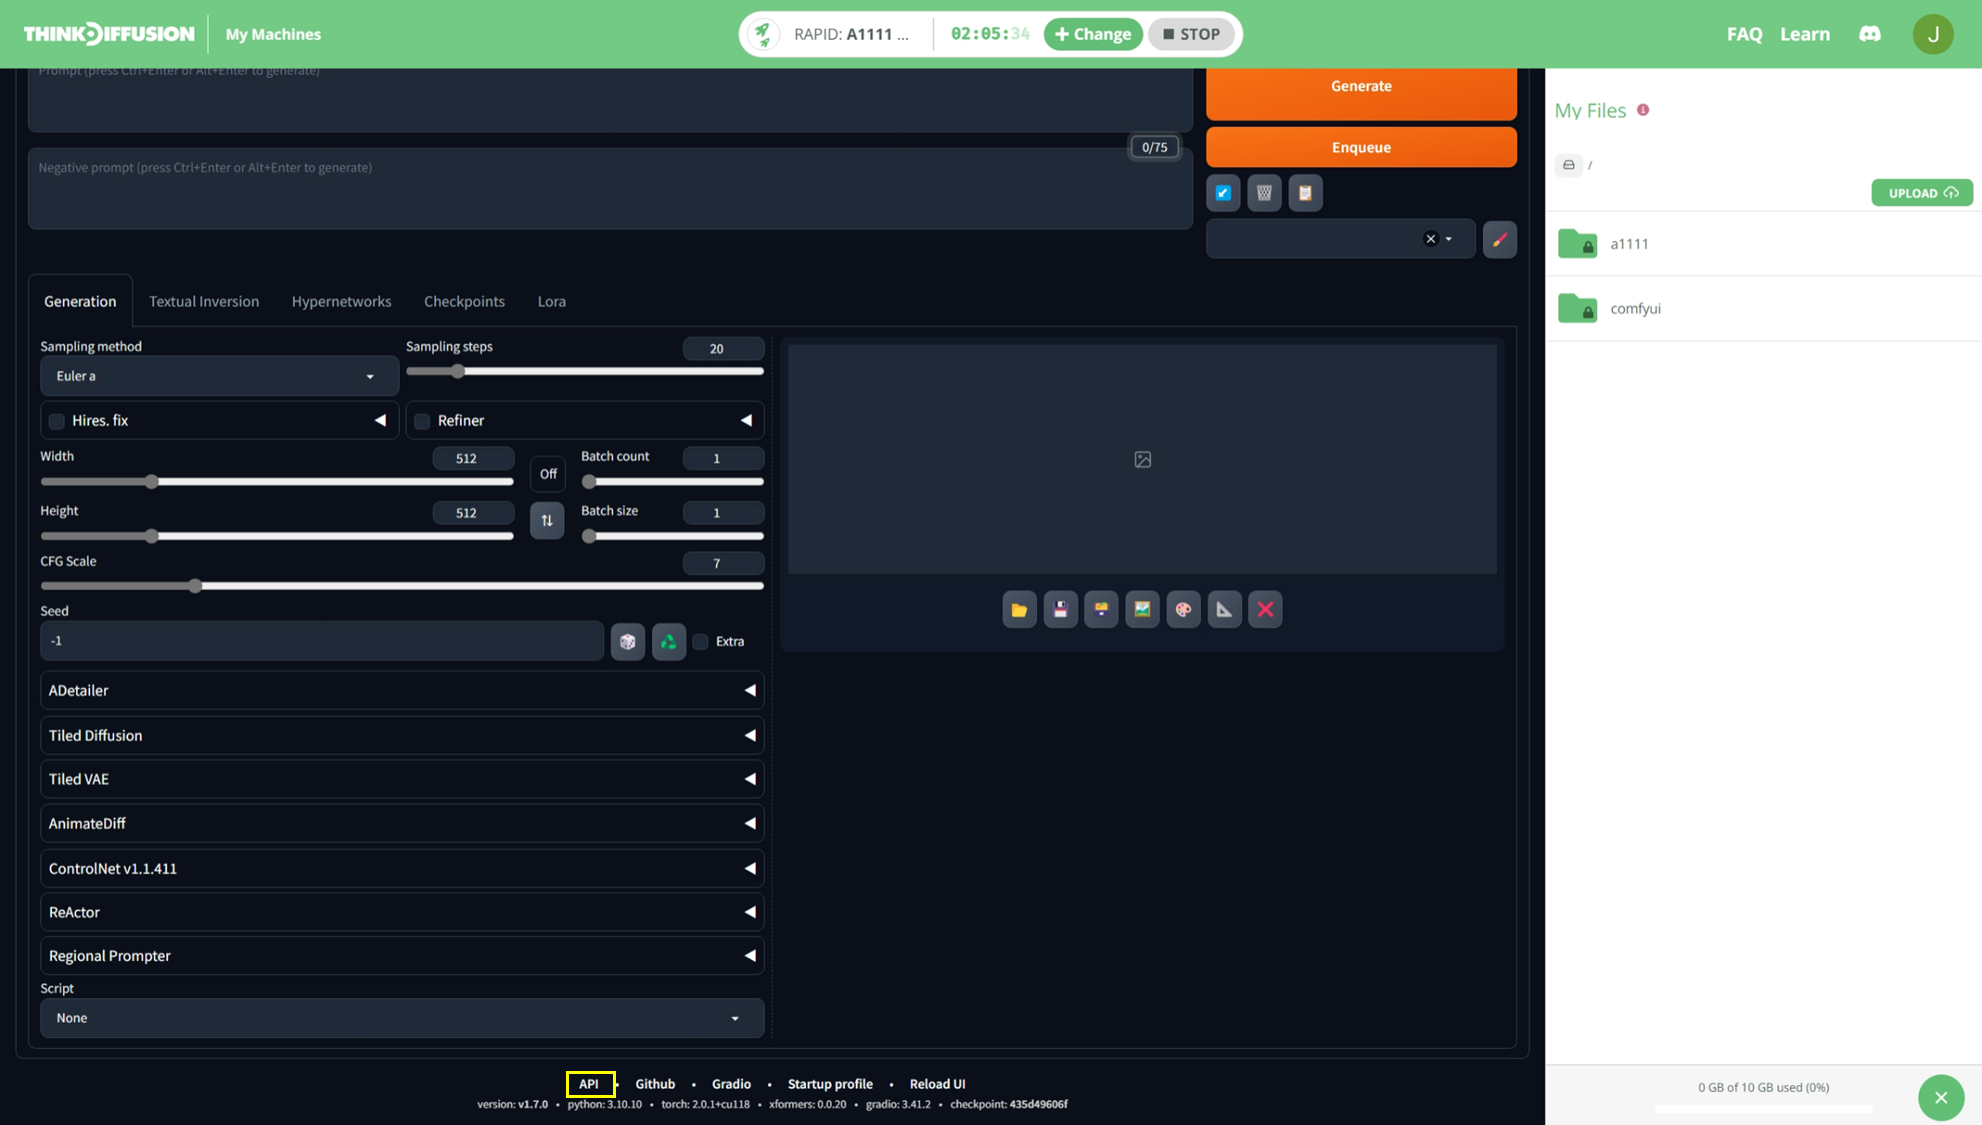
All Automatic1111 machines have API enabled. Follow these simple steps to view the API docs and test different API endpoints.<br>

1. After launching an A1111 machine, scroll down to the footer of the page where you find a link to the **API** docs page.

   <br>

   <figure><img src="https://learn.thinkdiffusion.com/content/images/2024/01/image-4.png" alt="" height="1125" width="1982"><figcaption></figcaption></figure>

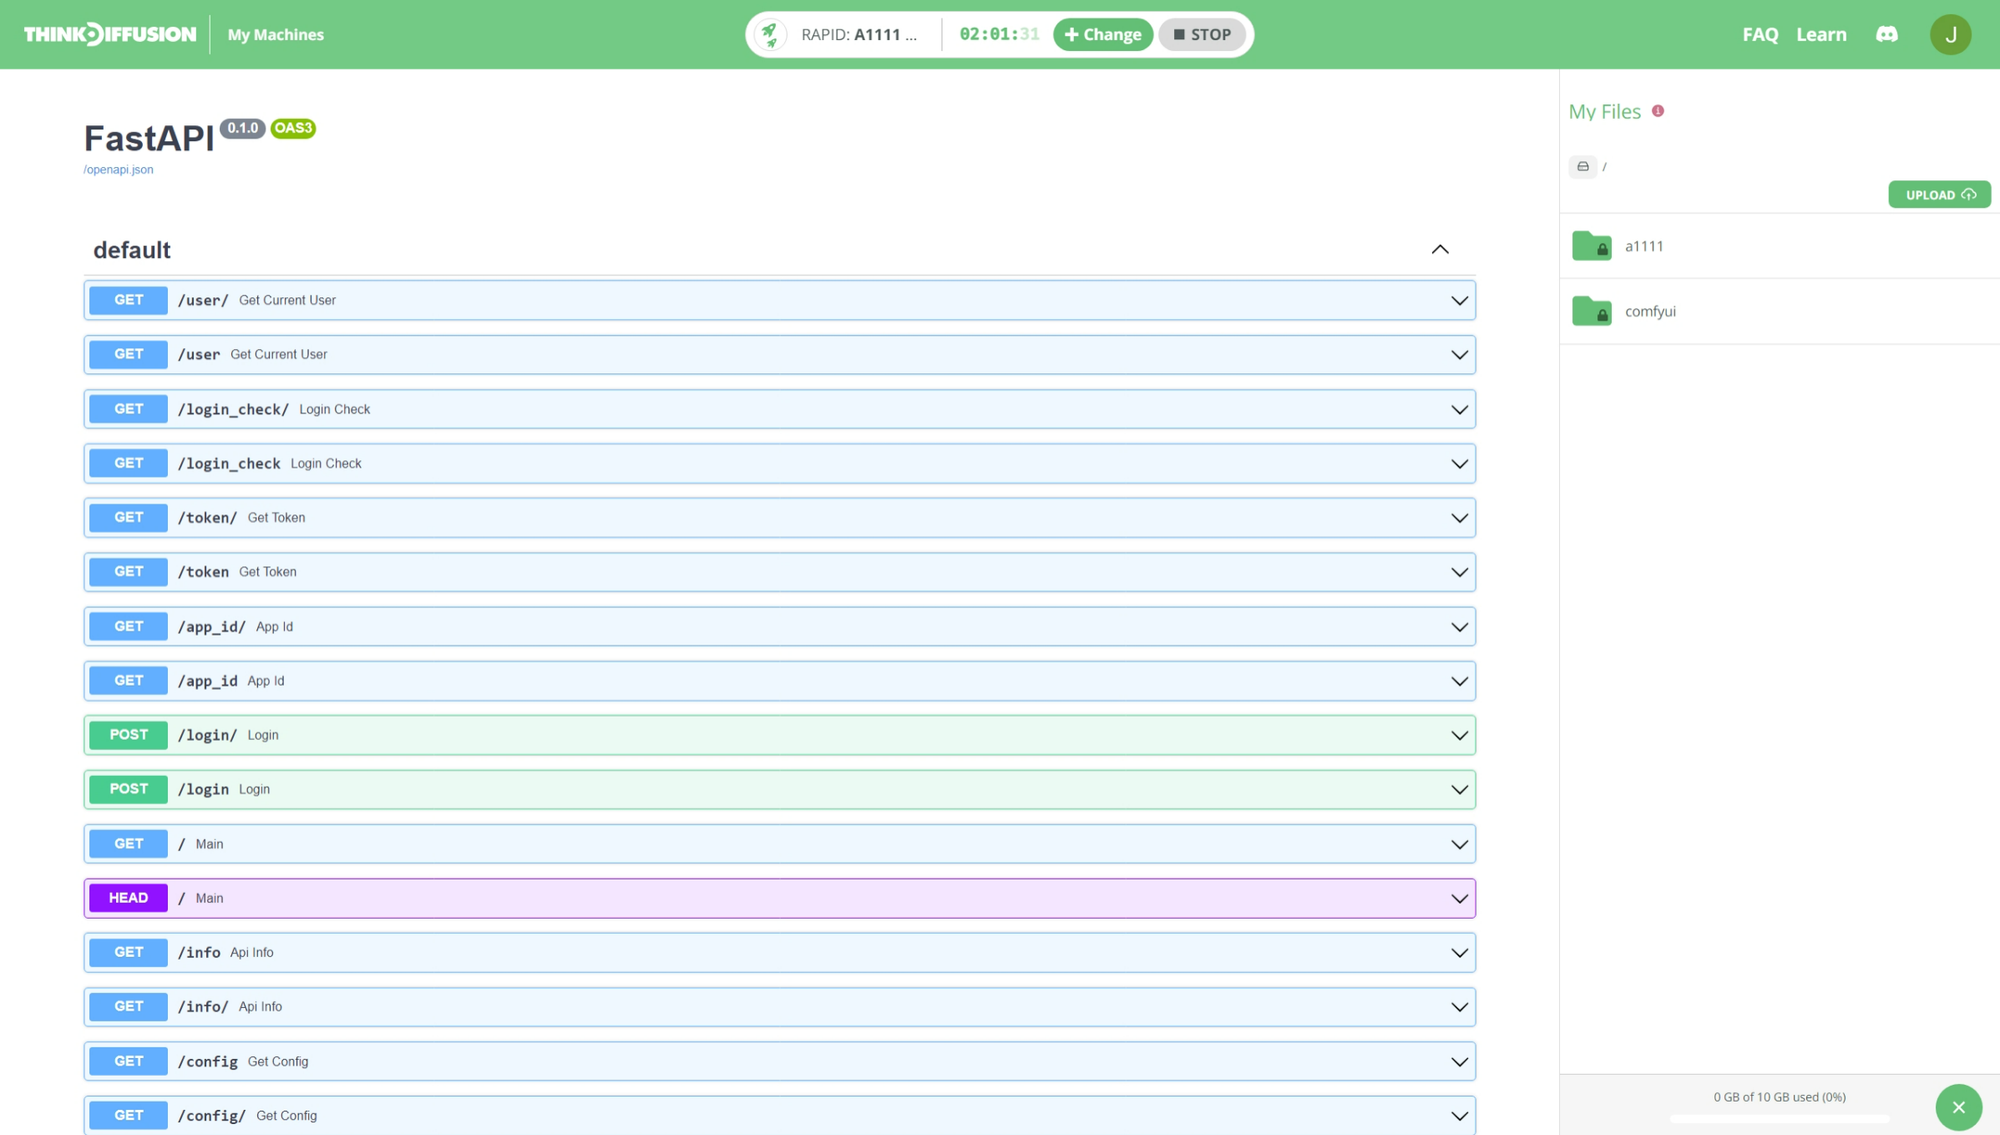
   2. Click on the **API** link to navigate to the **/docs** page (within in the machine iframe).

   <figure><img src="https://learn.thinkdiffusion.com/content/images/2024/01/image-6.png" alt="" height="1135" width="2000"><figcaption></figcaption></figure>

   \
   **⚡️Tip:** To navigate back, right click on any empty space in the iframe and select the **Back**.

   **⚡️Tip:** You may optionally open the link in a new tab by right-clicking on the **API** link and selecting **Open link in new tab**<br>

   3. To access your API remotely you will need the full machine URL which you can get by hovering over the **API** link or by copying the **API** link's URL and removing the **/docs** from the path.

   <figure><img src="https://learn.thinkdiffusion.com/content/images/2024/01/image-8.png" alt="" height="123" width="1922"><figcaption></figcaption></figure>

<br>


# How to use extensions in Automatic1111

## **What are extensions?** <a href="#what-are-extensions" id="what-are-extensions"></a>

{% hint style="info" %}
Some popular extensions include: *ReActor faceswap, ADetailer, AnimateDiff, AgentScheduler, ControlNet, Deforum, Infinite Zoom, Inpaint Anything, Loopback Wave, Openpose Editor, Regional Prompter, SadTalker, Temporal-Kit, Ultimate SD Upscale, and Wav2Lip Studio*. \
\
**They're all preinstalled on Think Diffusion machines.**
{% endhint %}

<figure><img src="https://learn.thinkdiffusion.com/content/images/2023/11/thinkdiffusion-automatic1111-extensions.webp" alt="" height="506" width="975"><figcaption></figcaption></figure>

Extensions are technically scripts, but you can think of them as helpful **modules/plugins created by the open source community** that enhance and extend functionality, ease of use, shape our workflows and make Stable Diffusion the most powerful AI art generator in the world.

## How do I install extensions in Automatic1111? <a href="#how-do-i-install-extensions" id="how-do-i-install-extensions"></a>

\
Most extensions can be installed by user with the steps below:

* Open the Extensions Tab in Automatic1111 SD Web U
* In the Extension Tab Open the "Install from URL" tab
* Paste the extensions link into the URL input ( i.e. *<https://github.com/fkunn1326/openpose-editor.git>*)
* Press install and wait for it to complete
* Restart Automatic1111 by going to the extensions tab and clicking the "Apply and Restart" UI Button

{% hint style="info" %}
For complex extensions that require additional installation steps beyond the self-serve Extensions tab, we're here to help. Ping us a message in the ⁠[💡-feature-requests](https://discord.com/channels/1102237470457864282/1125256301581176872) Discord channel.
{% endhint %}

{% embed url="<https://learn.thinkdiffusion.com/content/media/2023/11/extensions-install.mp4>" %}


# How to load your Deforum Settings in Automatic1111

If you want to load your favorite template for Deforum Settings, you can

**1.** Upload that file or navigate to it in the My Files panel

**2.** Copy its path into the **Settings File** field

**3.** Hit the "**Load All Settings**" button

{% hint style="info" %}
**💡** It will then appear in your My Files section ready for you to load when you next launch a machine.
{% endhint %}

{% embed url="<https://learn.thinkdiffusion.com/content/media/2023/08/Deforum.mp4>" %}
How to load your Deforum Settings in Automatic1111
{% endembed %}


# How to use an init image in Automatic1111

Once you have an image uploaded, you can then copy the link to use as an init image.

For example, if you are creating a Deforum video and want to use an init image, copy the link and then paste it in the init image text box

**1.** Simply **click on the copy path button** on any file.

* It's the first 🔗 **link button** next to the file uploaded.

**2.** Navigate to the **Init Image** field, and paste!

{% hint style="info" %}
Remember to select the ✅ Use init checkbox!
{% endhint %}

{% embed url="<https://learn.thinkdiffusion.com/content/media/2023/07/Copy-path-to-init.mp4>" %}
It's bloody easy, init??
{% endembed %}


# How to add more ControlNet models in Automatic1111

<div data-full-width="true"><figure><img src="/files/rUn1E8Td3CqHNO6KVUDM" alt=""><figcaption></figcaption></figure></div>

You can specify a path to a folder for additional ControlNet models using the ControlNet settings. While you can use any folder in your cloud storage, we recommend creating a ControlNet under your `/a1111/models.`

1\. Navigate to your ``/a1111/models folder and create a new `ControlNet` folder.``

2\. Navigate to the `/a1111/models/ControlNet` folder and upload the *\***.safetensors*** file. Also upload the corresponding *\***.yaml*** file if it has one. For more info on uploading, click [here](https://learn.thinkdiffusion.com/thinkdiffusion-faqs/#how-to-upload-a-file-from-your-device)

3\. Go to the ***Settings*** tab

4\. Scroll down and click on the ***ControlNet*** menu item on the left side

5\. Add the inputs folder path to the "*Extra path to scan for ControlNet models* *(e.g. training output directory)*" field\
(you can easily copy the folder path via the link button next to the Input folder; it should be "../user\_data/a1111/models/ControlNet" if you are using the recommended path above )

6\. Apply the changes by clicking "**Apply settings**"

7\. In the ControlNet section, click the 🔄 **refresh** button next the "Model" dropdown. You will have to do this separately for txt2img and img2img.

Your ControlNet model should now be available in the dropdown list.

<br>


# How to create a Hypernetwork in Automatic1111

Within the **Train** tab and and under the **Create hypernetwork** tab:

**1. Enter a name** for your embedding

**2.** And click **Create hypernetwork**

* The empty *.pt* file will appear under *../user\_data/a1111/models/hypernetworks/*
* **⚡️Protip:** Please ignore the 'Created None' when you do it as it does create the empty .pt file in the correct place

**3.** To use the hypernetwork file for training, you can head over to the **Train** tab and you will see your Hypernetwork file available.

{% embed url="<https://learn.thinkdiffusion.com/content/media/2023/08/Deforum.mp4>" %}


# Automatic1111 Frequently Asked Questions


# ComfyUI in the Cloud

Nail Stable Diffusion like a pro with ComfyUI - design and execute intricate workflows effortlessly using a flowchart/node-based interface—drag and drop, and you're set.Tap into a growing library of community-crafted workflows, easily loaded via PNG or JSON. Speed-optimized and fully supporting SD1.x, SD2.x, and SDXL, ComfyUI is your go-to for fast repeatable workflows.<br>

**Just getting started? Check out the** [**ComfyUI Introduction Course.**](https://thinkdiffusion.gitbook.io/my-first-page/)

{% embed url="<https://vimeo.com/1070184738>" %}

**Why use Comfy?**

* Drag & Drop complex community-created workflows in seconds with just the output PNG or a JSON file.
* Customize and create workflows to your unique needs, easily saved for future use.
* If you're wired to think in steps and thrive on workflows, ComfyUI is your native language.

<a href="https://www.thinkdiffusion.com/select-machine/featured/comfy/beta/ultra" class="button primary">Run ComfyUI on the Cloud</a>


# Intro to ComfyUI Course for Beginners & Pros

Watch step-by-step guide on how to begin with ComfyUI.

<a href="https://www.thinkdiffusion.com/select-machine/featured/comfy/beta/ultra" class="button primary">Run ComfyUI on the Cloud</a>

<table data-view="cards"><thead><tr><th></th><th data-hidden data-card-cover data-type="files"></th><th data-hidden data-card-target data-type="content-ref"></th></tr></thead><tbody><tr><td></td><td><a href="/files/XwVqO8Gwd7wnwgBX3o7q">/files/XwVqO8Gwd7wnwgBX3o7q</a></td><td><a href="/pages/wNJAnafmZaNex6T2YllA">/pages/wNJAnafmZaNex6T2YllA</a></td></tr><tr><td></td><td><a href="/files/jx22spbSzx49frKFAnsL">/files/jx22spbSzx49frKFAnsL</a></td><td><a href="/pages/W9OjNNF0H64tfsAhIRnu">/pages/W9OjNNF0H64tfsAhIRnu</a></td></tr><tr><td></td><td><a href="/files/PfzEMuiliwwF5MvhrR2G">/files/PfzEMuiliwwF5MvhrR2G</a></td><td><a href="/pages/M6GP9T7xHcYfIn3UlAk3">/pages/M6GP9T7xHcYfIn3UlAk3</a></td></tr><tr><td></td><td><a href="/files/TQCbPhbkdtqjPrZsYV0G">/files/TQCbPhbkdtqjPrZsYV0G</a></td><td><a href="/pages/PyUkddXYWGhLxM34Hhsx">/pages/PyUkddXYWGhLxM34Hhsx</a></td></tr><tr><td></td><td><a href="/files/r6ANT55ZEDBXKBwyN0wO">/files/r6ANT55ZEDBXKBwyN0wO</a></td><td><a href="/pages/OTc1IPEOdNCPwfXV3laQ">/pages/OTc1IPEOdNCPwfXV3laQ</a></td></tr><tr><td></td><td><a href="/files/opE7Yl1GAsDUTi17CH9J">/files/opE7Yl1GAsDUTi17CH9J</a></td><td></td></tr></tbody></table>


# Chapter 1: ComfyUI interface

{% embed url="<https://vimeo.com/1087438748>" %}

<a href="https://www.thinkdiffusion.com/select-machine/featured/comfy/beta/ultra" class="button primary">Run ComfyUI on the Cloud</a>


# Chapter 2: ComfyUI fundamentals

{% embed url="<https://vimeo.com/1087438047>" %}

<a href="https://www.thinkdiffusion.com/select-machine/featured/comfy/beta/ultra" class="button primary">Run ComfyUI on the Cloud</a>


# Chapter 3: ComfyUI Workflows

{% embed url="<https://vimeo.com/1087438781>" %}

<a href="https://www.thinkdiffusion.com/select-machine/featured/comfy/beta/ultra" class="button primary">Run ComfyUI on the Cloud</a>


# Chapter 4: ComfyUI Settings

{% embed url="<https://vimeo.com/1087438805>" %}

<a href="https://www.thinkdiffusion.com/select-machine/featured/comfy/beta/ultra" class="button primary">Run ComfyUI on the Cloud</a>


# Chapter 5: ComfyUI KSampler

{% embed url="<https://vimeo.com/1087437987>" %}

<a href="https://www.thinkdiffusion.com/select-machine/featured/comfy/beta/ultra" class="button primary">Run ComfyUI on the Cloud</a>


# Chapter 6: ComfyUI Denoising

{% embed url="<https://vimeo.com/1087621893?share=copy#t=0>" %}

<a href="https://www.thinkdiffusion.com/select-machine/featured/comfy/beta/ultra" class="button primary">Run ComfyUI on the Cloud</a>


# Download ComfyUI Workflows

## For all guides, go here: <https://learn.thinkdiffusion.com/tag/comfyui/>

## List of top ComfyUI Workflows to download:

1. <https://learn.thinkdiffusion.com/top-10-comfyui-workflows-for-ai-text-to-video-and-video-to-video-2025/>
2. ### [How to Use Wan 2.1 for Video Style Transfer: A Step-by-Step Guide](https://learn.thinkdiffusion.com/wan-2-1-video-style-transfer-guide/)
3. ### [Consistent Character Creation with Flux & ComfyUI](https://learn.thinkdiffusion.com/consistent-character-creation-with-flux-comfyui/)
4. ### [Light Up Your Images with IC Light AI](https://learn.thinkdiffusion.com/ic-light-basics/)
5. ### <https://learn.thinkdiffusion.com/transform-videos-with-ai-dancing-noodles-step-by-step-tutorial/>
6. ### [ComfyUI Workflow for Animating Parts of an Image: Motion Brush](https://learn.thinkdiffusion.com/motion-brush-workflow/)
7. ### <https://learn.thinkdiffusion.com/the-inpainting-revolution-how-reference-images-with-flux-fill-and-flux-redux-are-changing-the-game/>


# How to upload a model in ComfyUI

Uploading into ComfyUI through our file browser is exactly the same as you would through A1111 - see [those instructions above](https://learn.thinkdiffusion.com/thinkdiffusion-faqs/#how-to-upload-a-model-by-url-eg-civitai). Basically:

* In **My Files**, navigate to the correct folder.
* And click upload to reveal the URL field for your URL.

The important step is navigating to the correct folder depending on the type of model you're uploading.

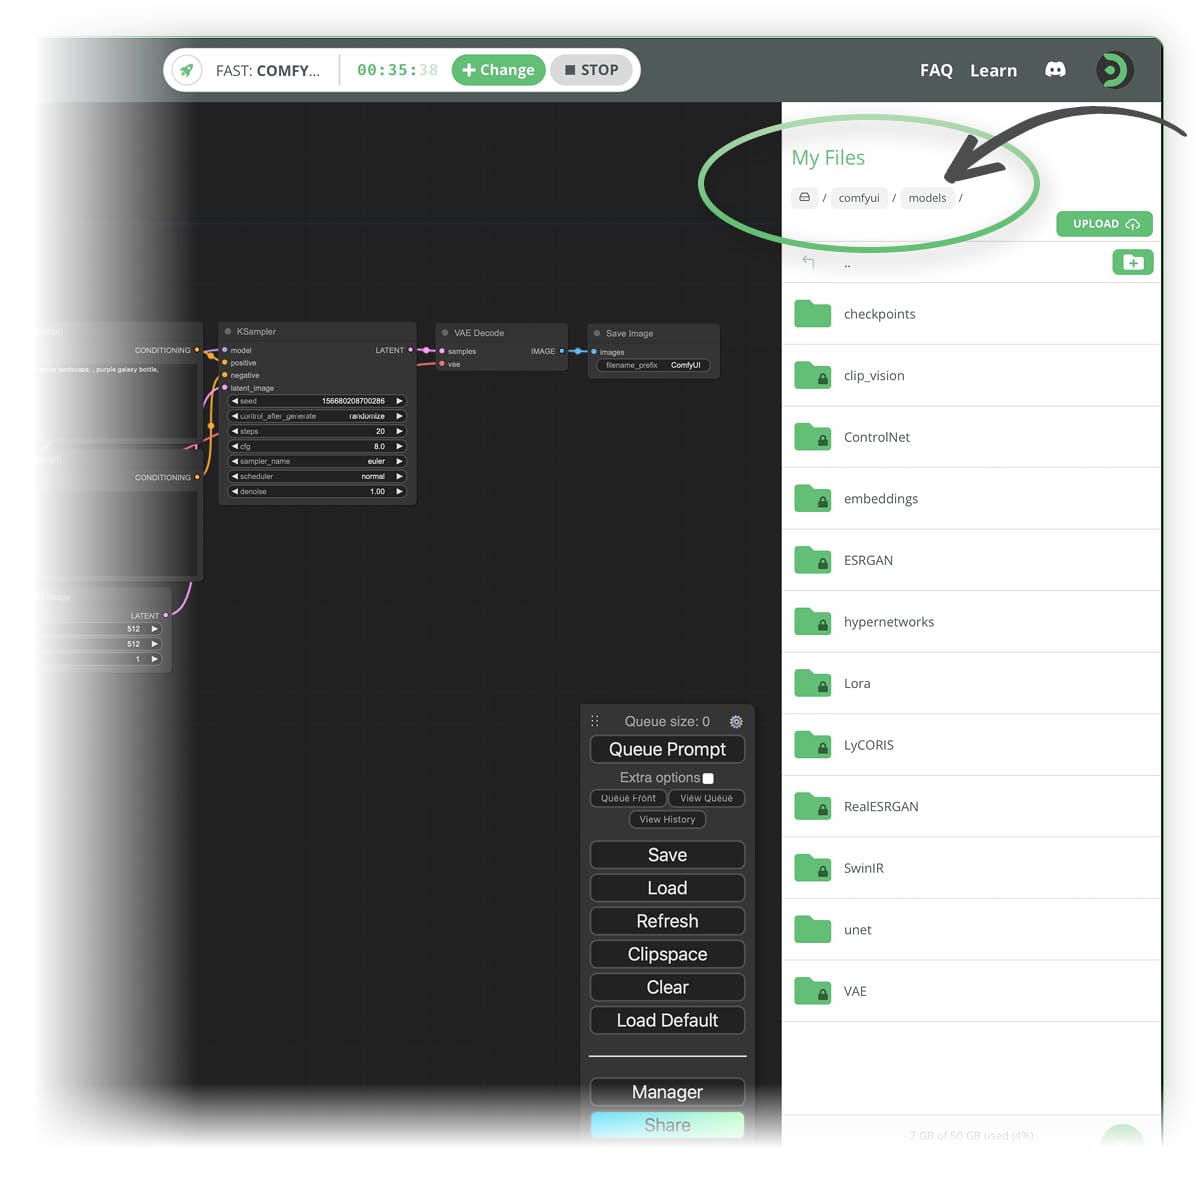
Navigate to: **/ comfyui / models /**

<figure><img src="https://learn.thinkdiffusion.com/content/images/2024/01/Comfy-tutorial-file-browser.jpg" alt="" height="1200" width="1200"><figcaption></figcaption></figure>

You'll see that Checkpoints, ControlNet Models, LoRAs, LyCORIS', VAEs, and Hypernetworks all have their corresponding and designated subfolder within the models folder.

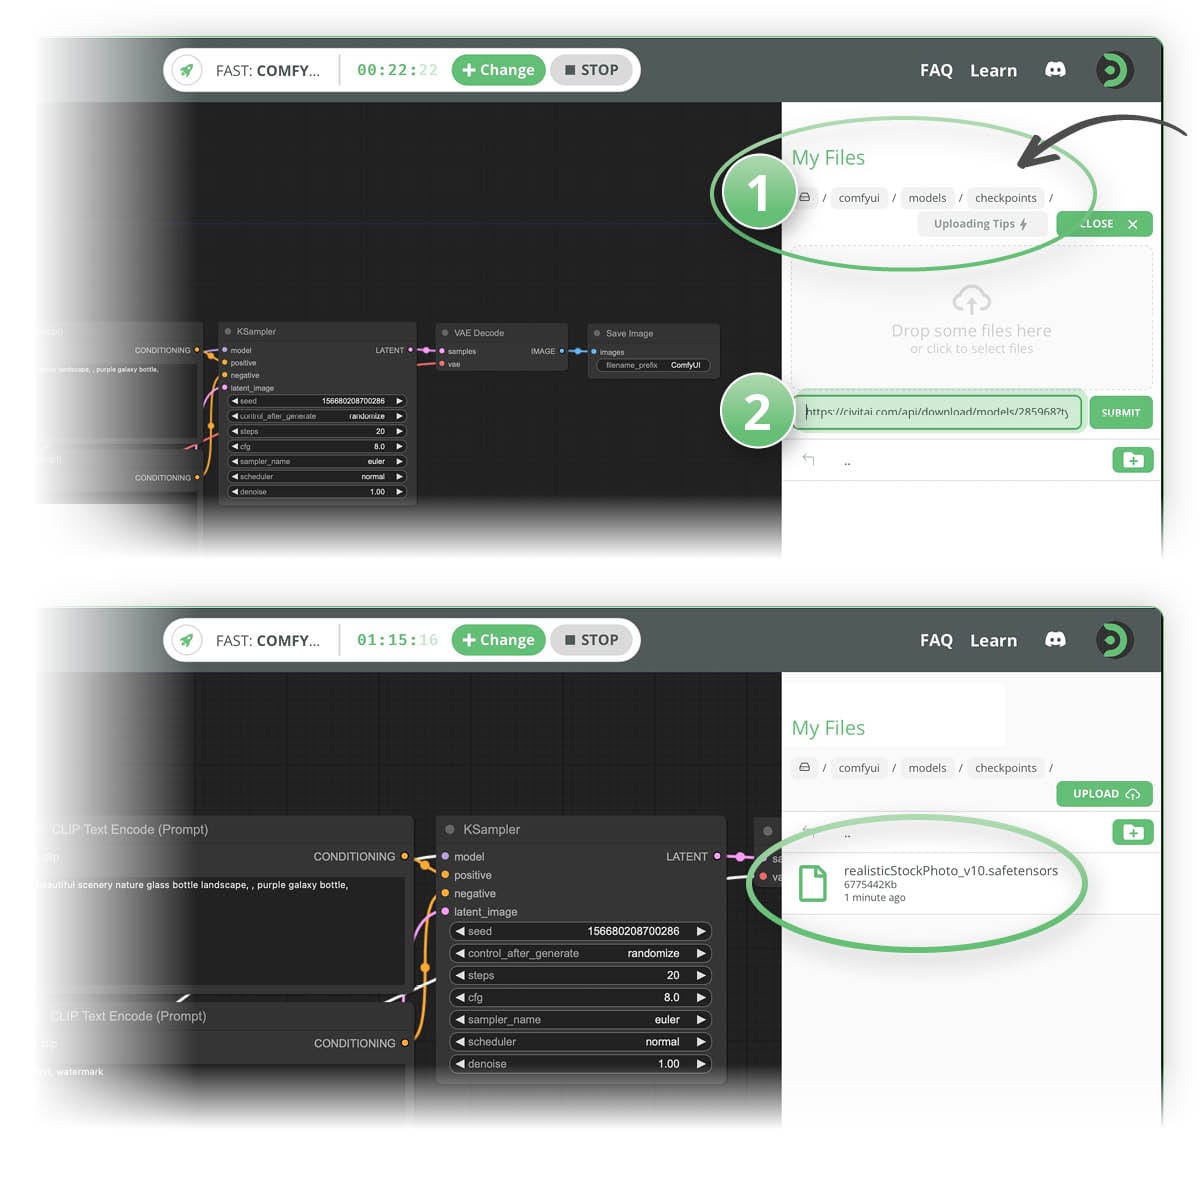
Choose the subfolder that matches the file type you're uploading. In the example below, we will:

* **(1)** Navigate to the **/checkpoints/** subfolder to upload a checkpoint file.
* **(2)** Paste the URL of your file into the upload field.

You'll see your newly uploaded model show up below in the file area.

<figure><img src="https://learn.thinkdiffusion.com/content/images/2024/01/Comfy-tutorial-file-browser-paste.jpg" alt="" height="1200" width="1200"><figcaption></figcaption></figure>

**Learn how to find the URL of the file you're uploading**

Click on RESTART UI so ComfyUI refreshes its model listing.\
Sometimes Comfy requires you to refresh the browser.

<br>

## &#x20;<a href="#how-to-upload-a-file-from-your-device" id="how-to-upload-a-file-from-your-device"></a>

## &#x20;<a href="#how-to-upload-a-file-from-your-device" id="how-to-upload-a-file-from-your-device"></a>

## How to upload a file from your device <a href="#how-to-upload-a-file-from-your-device" id="how-to-upload-a-file-from-your-device"></a>

{% embed url="<https://learn.thinkdiffusion.com/content/media/2023/08/UploadFile.mp4>" %}

To upload a file or image, open your **My Files** panel

Then simply **click the ⬆️ Upload button** to reveal the drag & drop/upload area, and tap the area to upload the file of your choice.

You can also upload with a single URL via [Sites like Civitai](https://learn.thinkdiffusion.com/thinkdiffusion-faqs/#how-to-upload-a-model-by-url-eg-civitai) or from file sharing services like [Google Drive](https://learn.thinkdiffusion.com/thinkdiffusion-faqs/#how-to-upload-from-google-drive).

***

## How to upload a model by URL ( eg Civitai ) <a href="#how-to-upload-a-model-by-url-eg-civitai" id="how-to-upload-a-model-by-url-eg-civitai"></a>

1. **On Thinkdiffusion, navigate to the appropriate folder, first.** Your uploads will be placed in that file path.

* For example, to upload a custom checkpoint model by URL, open your **My Files** panel, and navigate to the following folder:\
  *../user\_data/a1111/models/Stable-Diffusion/*

<figure><img src="https://learn.thinkdiffusion.com/content/images/2023/09/image-2.png" alt="" height="85" width="580"><figcaption></figcaption></figure>

* If you're uploading a custom LoRA, the path would would be: *../user\_data/a1111/models/Lora*

<figure><img src="https://learn.thinkdiffusion.com/content/images/2023/09/image.png" alt="" height="84" width="483"><figcaption></figcaption></figure>

**2. Click the ⬆️ Upload button** to reveal the upload field

<figure><img src="https://learn.thinkdiffusion.com/content/images/2023/09/image.jpeg" alt="" height="88" width="328"><figcaption></figcaption></figure>

**3. Paste in the URL** of your choosing. The URL can be from Civitai, huggingface, or any other URL hosting the files.

<figure><img src="https://learn.thinkdiffusion.com/content/images/2023/09/image-1.jpeg" alt="" height="120" width="1016"><figcaption></figcaption></figure>

**Find the correct link to right-click on Civitai:**

<figure><img src="https://learn.thinkdiffusion.com/content/images/2023/09/civitai-copy-rounded.png" alt="upload in progress, 0" height="300" width="850"><figcaption><p>Find the correct link to right-click on Civitai. You can also use the big download button on the top of the model's page, but when there are multiple files offered, you'll be able to choose individual files from this area.</p></figcaption></figure>

**Find the correct link to right-click on Huggingface:**

<figure><img src="https://learn.thinkdiffusion.com/content/images/2023/09/image-4.png" alt="" height="179" width="850"><figcaption><p>Find the correct link to right-click on Huggingface with the download icon, NOT the model's name. </p></figcaption></figure>

**4.** Hit the 🔄 **Refresh** button next to the appropriate models list (if applicable) and Voila! 🪄✨

***

## How to upload from Google Drive <a href="#how-to-upload-from-google-drive" id="how-to-upload-from-google-drive"></a>

Uploading files with a direct google drive link is as easy as pasting the URL of the file into the URL field.

\
It’s ***GETTING*** the link from Google that’s the tricky part, due to their security checks. In the future, we’ll be implementing a solution for this, and in the meantime you can take the steps below:

**⚡️Protip**: First confirm your file is publicly available with the link, so that "Anyone with the link" can access the file.

<figure><img src="https://learn.thinkdiffusion.com/content/images/2023/09/2023-09-22_9-11-37.png" alt="" height="262" width="541"><figcaption></figcaption></figure>

**1. "Copy link" from Google drive**

* It would look something like this: *<https://drive.google.com/file/d/1p66tMx0YhzXfzIxlupa8Oaqp-BJZA0Rf/view?usp=drive\\_link>*

**2. Convert the Google Drive public URL to a fully downloadable link**

* You can use the format:\
  *<https://drive.google.com/uc?export=download&id=YOUR_FILE_ID>*

**3. Replace “YOUR\_FILE\_ID” with the actual file ID** from your Google Drive URL.

* In this example, the file ID is *1p66tMx0YhzXfzIxlupa8Oaqp-BJZA0Rf*\
  so the fully downloadable link would be:\
  *<https://drive.google.com/uc?export=download&id=1p66tMx0YhzXfzIxlupa8Oaqp-BJZA0Rf>*

***

**Important**: If your file is too large, Google drive will present you with this confirmation:

<figure><img src="https://learn.thinkdiffusion.com/content/images/2023/08/image.jpeg" alt="" height="191" width="686"><figcaption></figcaption></figure>

You then need to follow these steps below to get the correct URL:

**1. Go to Inspect mode** with a right click & Inspect (or F12 button on Windows).

<figure><img src="https://learn.thinkdiffusion.com/content/images/2023/09/inspect.png" alt="" height="422" width="435"><figcaption></figcaption></figure>

**2. Select the Network tab**

**3**. **Click on the** "**Download anyway"** **button**, then click Cancel when the download window pops up.

**4. Click on the "uc?id=......"** in the Name column on the left.

**5. Click on the "Headers" Sub tab**

**6. Copy the Request URL**\
( which you can find in the: *Network Tab > Headers Sub tab > Request URL )*

The Request URL is the fully downloadable URL to your file. Now you can *FINALLY* paste *THAT* into the Think Diffusion Upload via URL field!

<figure><img src="https://learn.thinkdiffusion.com/content/images/2023/09/google-drive2.jpg" alt="" height="1200" width="1400"><figcaption></figcaption></figure>


# How to generate your first AI image with Flux in ComfyUI

Start your ThinkDiffusion machine and load the text2image AI workflow

* Generate an image
* Generate images in different sizes
* Try writing your own prompts

{% embed url="<https://player.vimeo.com/video/1011001169?app_id=122963>" %}

{% file src="/files/2ARQBkcwBsl0K6LaQ5er" %}
How to generate your first AI image with Flux in ComfyUI
{% endfile %}

Full tutorial: <https://learn.thinkdiffusion.com/generate-your-first-ai-image-with-flux-on-thinkdiffusion/>


# How to Install Custom Nodes in ComfyUI

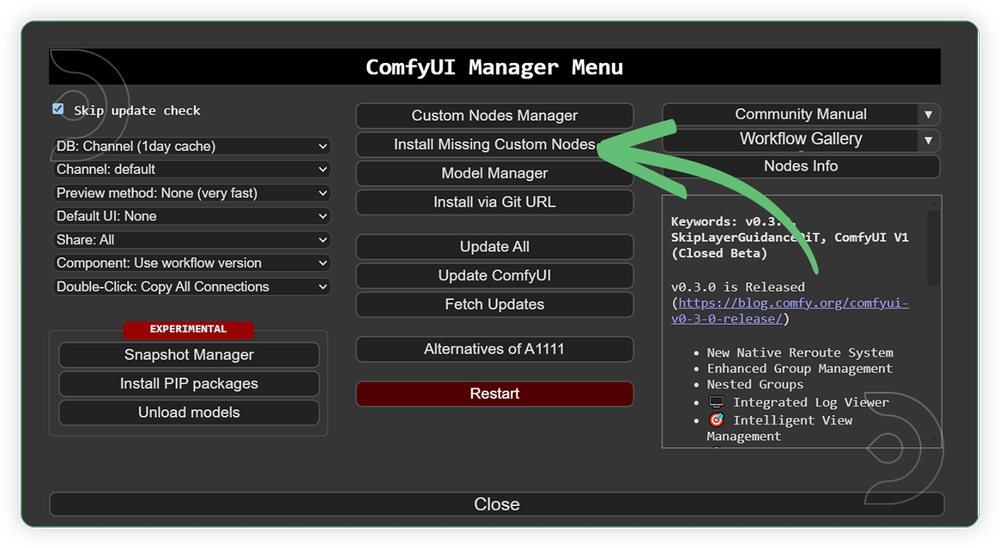
If you see red nodes in your workflow, it means you're missing some required custom nodes. Follow these steps to install them so your workflow can function properly.

1. Go to ComfyUI Manager  > Click Install Missing Custom Nodes

<figure><img src="https://learn.thinkdiffusion.com/content/images/2025/04/image-9.png" alt="" height="548" width="1000"><figcaption></figcaption></figure>

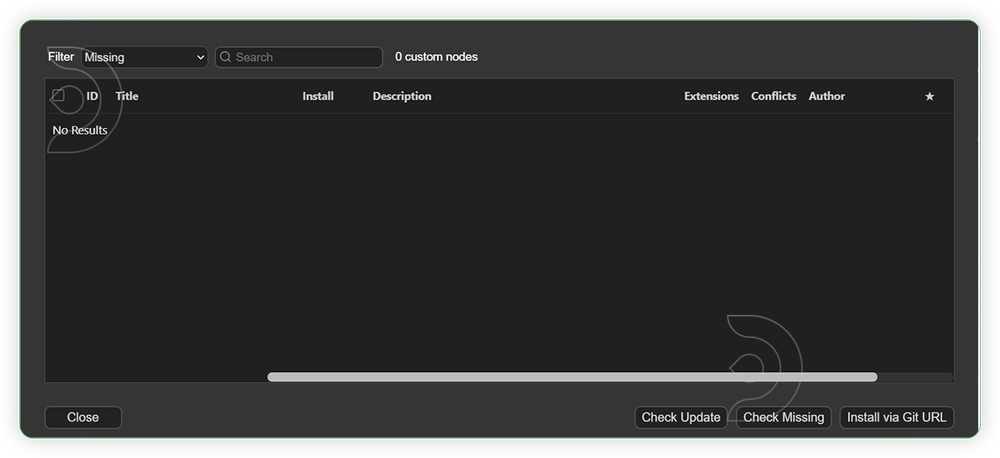
2. Check the list below if there's a list of custom nodes that needs to be installed and click the install.

<figure><img src="https://learn.thinkdiffusion.com/content/images/2025/04/image-8.png" alt="" height="458" width="1000"><figcaption></figcaption></figure>

## FAQs

* **"Installed nodes show as red even after restart."**
  * Suggested fix: Delete and reinstall the node via Git URL instead of using the Node Manager.
* **"How do I remove a broken node?"**
  * Delete the node folder from `comfyui/custom-nodes/`. TD-Pro users can do this via the file browser without launching a machine.
*


# Page 2


# Wan 2.1 in the Cloud

{% hint style="info" %}
To use Wan 2.1, you need to install the Wan Workflow onto a ComfyUI interface. Here's a live webinar and a few guides with workflows to help you get started.
{% endhint %}

<a href="https://www.thinkdiffusion.com/select-machine/featured/comfy/beta/ultra" class="button primary">Run ComfyUI on the Cloud</a>

## Watch the Wan 2.1 Live Webinar

{% embed url="<https://www.youtube.com/watch?v=9Y8bs3NCXXE>" %}

## Explore Wan Tutorials & Download Workflows

1. [How to Use Wan 2.1 for Video Style Transfer: A Step-by-Step Guide](https://learn.thinkdiffusion.com/wan-2-1-video-style-transfer-guide/)
2. &#x20;[Discover why Wan 2.1 is the best AI video model right now](https://learn.thinkdiffusion.com/discover-why-wan-2-1-is-the-best-ai-video-model-right-now/)
3. &#x20;[Depth in Every Frame: How Wan 2.1 Elevates Video Generation using Control LoRAs](https://learn.thinkdiffusion.com/depth-in-every-frame-how-wan-2-1-elevates-video-generation-using-control-loras/)


# How to run Wan 2.1 in ComfyUI for ImagetoVideo Generation

## 1. Download the workflow file here

{% file src="/files/Rt7bSHNn6wyOLJO3TdYY" %}

1. *Drag & drop it into your ComfyUI window, whether locally or on ThinkDiffusion.*

{% hint style="info" %}
*If you're using ThinkDiffusion, it's necessary to use at minimum the Turbo 24gb machine, but we do recommend the Ultra 48gb machine.*
{% endhint %}

<figure><img src="/files/F3VW0Z1DXPVsqE1wZ5na" alt=""><figcaption></figcaption></figure>

Follow this tutorial to set up the workflow properly and run: <https://learn.thinkdiffusion.com/discover-why-wan-2-1-is-the-best-ai-video-model-right-now/>


# Fooocus in the Cloud

The new kid on the block, Fooocus makes generating beautiful art as simple as it gets.From the pioneer creator of ControlNet, Fooocus lets you focus on your ideas - just prompt and generate in seconds. Mind-blowing results made easy, without the tweaking of more advanced interfaces.

**Why use Fooocus?**

* Forget the difficult technical parameters, and just enjoy the interaction between you and the AI.
* Just type your vision, and marvel at your creation. Everything’s already optimized for you.
* Quickly try any of the thousands of LoRAs from Civitai, HuggingFace, and beyond.

<a href="https://www.thinkdiffusion.com/select-machine/featured/fooocus/current/ultra" class="button primary">Run Fooocus in the Cloud</a>

<figure><img src="/files/ZEfrDvf9f9FFMQjg9zSR" alt=""><figcaption></figcaption></figure>

## Some awesome Fooocus tutorials to get started:

{% embed url="<https://www.youtube.com/watch?themeRefresh=1&v=8Rh0TsZeF6c>" %}

{% embed url="<https://www.youtube.com/watch?v=8k4UPKaAiSc>" %}

<a href="https://www.thinkdiffusion.com/select-machine/featured/fooocus/current/ultra" class="button primary">Run Fooocus in the Cloud</a>


# Kohya in the Cloud

Kohya is the go-to for model creators, providing a dedicated UI focused on allowing you to quickly train and fine-tune your own models, LoRAs and Textual Inversions.

**Why use Kohya?**

* You’re a badass model creator who can train a base model (SD1.5 & SDXL) using Dreambooth.
* You want to train LoRAs (SD1.5 & SDXL). The most popular use case is to create SDXL LoRAs for character-specific or style-focused enhancements that the base SDXL model does not cover.
* You want to create Textual Inversions / Embeddings

<a href="https://www.thinkdiffusion.com/select-machine/featured/kohya/current/ultra" class="button primary">Run Kohya in the Cloud</a>

## Some awesome Kohya tutorials to get started:

{% embed url="<https://www.youtube.com/watch?v=pQ0RzNNlKQk>" %}

{% embed url="<https://www.youtube.com/watch?v=j-So4VYTL98>" %}


# Forge in the Cloud

Forge WebUI is gaining popularity for its speed, efficiency and support for Flux. Forge is essentially an optimized version of A1111, with a focus on resource management, faster inference times, and several novel features including IP Adapter masks and Flux support.

<br>

{% embed url="<https://www.youtube.com/watch?v=zY9UCxZui3E>" %}

{% embed url="<https://www.youtube.com/watch?v=QR1-Qpxuv94>" %}

{% embed url="<https://www.youtube.com/watch?v=dbqiz6jt0o8>" %}


# Private and secure machines

How is my workspace dedicated and private?

{% hint style="info" %}
Think Diffusion creates private and dedicated cloud workspaces for every individual, with everyone’s files staying secure and untouched.
{% endhint %}

**Your private computer & storage for all users regardless of plan.**

Everything happens on a dedicated computer created for each individual.

All AI work is done on a private CPU/GPU, each assigned to a single user. It’s like having your own private computer and software, without the technical costs and maintenance.

This architecture is fundamental to Think Diffusion, and all users enjoy this benefit regardless of their pricing plan.

<br>


# File Management

Most AI tools make you re-upload files or burn compute just to grab an output file or check a log. That gets expensive fast - and it wastes your time.

## 🗂️ Folder Structure

When you launch a machine on ThinkDiffusion, the platform automatically creates a **top-level folder** for that specific app. Each app has its own folder. You’ll see these in the file browser.

{% hint style="info" %}
File paths matter. Some workflows will fail if a model isn’t in the right subfolder.
{% endhint %}

#### Example top-level folders:

* `/comfy/` → for ComfyUI machines
* `/kohya/` → for LoRA training
* `/automatic1111/` → for A1111 sessions

Each of these app folders contains its own structure - and they’re separated so you don’t mix tools.

#### Inside each app folder, there are common subfolders:

&#x20;**`/logs/`**

> Where machine logs are stored. Each time you launch a machine, it writes logs here. File names match the machine ID in your URL.

&#x20;**`/models/`**

> Where model files are stored (e.g. LoRAs, checkpoints).\
> Depending on the app, these might be split into:

* `/models/checkpoints/`
* `/models/loras/`
* `/models/vae/`

**`/outputs/` or `/outputs/img2img/`**

> Saved images, video frames, or render results show up here - depending on the app.

&#x20;**`/input/` or `/images/`**

> Where uploaded images, masks, or reference files go. Some workflows look for inputs in specific folders.<br>

**Note:** *On free accounts, files are only accessible while a machine is running. Files are automatically deleted after 48 hours of inactivity. The 24/7 File Browser is available on TD Pro accounts.*

## 🗂️ 24/7 File Browser

* Your files persist between sessions
* You don’t need to launch a machine just to grab a LoRA
* You can prep and organize workflows without paying for idle GPU time
* You can debug logs even while your machine is launching

With the 24/7 File Browser:

{% hint style="info" %}
The 24/7 File Browser gives you full access to your files - without launching a machine. You can upload models, check logs, organize folders, and download outputs, all without paying for GPU time.\
\
&#x20;It’s only available with **ThinkDiffusion Pro**.
{% endhint %}

<br>


# Navigate your files

## How to master your files like a Pro <a href="#how-to-master-your-files-like-a-pro" id="how-to-master-your-files-like-a-pro"></a>

Our built-in file management browser and tools provide you with a personal and persistent cloud storage drive and a robust system that's essentially an extension of your own device.

Your files will stay persistent across all sessions & machines, and with a subscription will have increased storage with no inactivity cap.

{% embed url="<https://learn.thinkdiffusion.com/content/media/2023/08/Master-files.mp4>" %}

Just like your own drive, you can fully navigate its file structure to transfer and organize your work:

* [**Create new folders**](https://learn.thinkdiffusion.com/thinkdiffusion-faqs/#how-to-create-a-new-folder)
* [**Copy a file’s link**](https://learn.thinkdiffusion.com/thinkdiffusion-faqs/#how-to-copy-a-files-link)
* [**Upload files**](https://learn.thinkdiffusion.com/thinkdiffusion-faqs/#how-to-upload-a-file-from-your-device), models and extensions from your device
* [**Upload large models**](https://learn.thinkdiffusion.com/thinkdiffusion-faqs/#how-to-upload-a-model-by-url-eg-civitai) directly by URL or directly from Google drive

## How to create a new folder <a href="#how-to-create-a-new-folder" id="how-to-create-a-new-folder"></a>

It's super easy to organize files in Think Diffusion. Within the **My Files** panel:

* Simply click on the ➕ plus button and name the folder anything.

{% hint style="info" %}
&#x20;I tend to put all new folders in the *../user\_data/a1111/inputs/* folder as it helps me organize my inputs, but you're free to create new folders wherever you'd like.
{% endhint %}

{% embed url="<https://learn.thinkdiffusion.com/content/media/2023/07/Folders.mp4>" %}
Maybe we should just have a Dogs folder preinstalled?
{% endembed %}

## How to copy a file's link <a href="#how-to-copy-a-files-link" id="how-to-copy-a-files-link"></a>

Simply **click on the copy path button** on any file. It's the first 🔗 **link button** next to the file uploaded.

{% embed url="<https://learn.thinkdiffusion.com/content/media/2023/07/Copy-path.mp4>" %}
We debated whether making a video for this was necessary, but decided it was. For consistency!
{% endembed %}


# File Storage & Uploads

* **"What happens if I run out of temporary storage?"**
  * Free users get 10GB. TD-Pro gives 200GB persistent storage. You’ll need to delete or download files to free space if not on Pro.
* **"Why can't I upload files bigger than 2GB?"**
  * The machine file browser has a 2GB upload limit. TD-Pro users can bypass this using the 24/7 file browser.
* **"Why are uploads unstable or slow?"**
  * If the 24/7 file browser is slow, try the in-machine file browser (better bandwidth, smaller file support). You need an active machine to access it.
* **"Can I move files between folders?"**
  * Not yet. File move/copy features are in the product backlog.
* **"Can I use FTP clients like Filezilla?"**
  * No FTP access is available currently.


# Installing Custom Nodes in ComfyUI

**Most custom nodes will install fine for users, but in some cases the custom node needs dependencies to be installed on our end. Here are tips for installing custom nodes:**<br>

1. Don't forget to `Restart` the ComfyUI app and `Refresh` the browser after install. (as instructed by ComfyUI Manager)
2. After restart and refresh, if it still shows missing,
3. Check the logs (using the console logs or by openning the corresponding log file under `/comfyui/logs`)
   1. it may show install errors or load errors and should show "FAIL" before the custom node in the launch section.
   2. Share the log file with us as it can be a bit technical to read.
   3. The custom node may only work on later version of Comfy or other dependency already on ThinkDiffusion BETA release of Comfy. You can try on BETA.
   4. We may need to install some dependency. We can determine if you share the log file with us.
4. You can try to stop the machine and launch a new one. Some custom nodes require to come up from a full boot up, but this is less common.
5. If your custom node works after restart and refresh, but fails to load on a new launched machine
6. There a good chance that we need to install some dependency so that it persists between launches. We can determine if you share the log file with us.

If you see red nodes in your workflow, it means you're missing some required custom nodes. Follow these steps to install them so your workflow can function properly.

1. Go to ComfyUI Manager  > Click Install Missing Custom Nodes

<figure><img src="https://learn.thinkdiffusion.com/content/images/2025/04/image-9.png" alt="" height="548" width="1000"><figcaption></figcaption></figure>

2. Check the list below if there's a list of custom nodes that needs to be installed and click the install.

<figure><img src="https://learn.thinkdiffusion.com/content/images/2025/04/image-8.png" alt="" height="458" width="1000"><figcaption></figcaption></figure>

## FAQs

* **"Installed nodes show as red even after restart."**
  * Suggested fix: Delete and reinstall the node via Git URL instead of using the Node Manager.
* **"How do I remove a broken node?"**
  * Delete the node folder from `comfyui/custom-nodes/`. TD-Pro users can do this via the file browser without launching a machine.


# How to Upload Models

## How to upload a file from your device <a href="#how-to-upload-a-file-from-your-device" id="how-to-upload-a-file-from-your-device"></a>

{% embed url="<https://learn.thinkdiffusion.com/content/media/2023/08/UploadFile.mp4>" %}

To upload a file or image, open your **My Files** panel

Then simply **click the ⬆️ Upload button** to reveal the drag & drop/upload area, and tap the area to upload the file of your choice.

You can also upload with a single URL via [Sites like Civitai](https://learn.thinkdiffusion.com/thinkdiffusion-faqs/#how-to-upload-a-model-by-url-eg-civitai) or from file sharing services like [Google Drive](https://learn.thinkdiffusion.com/thinkdiffusion-faqs/#how-to-upload-from-google-drive).

***

## How to upload a model by URL ( eg Civitai ) <a href="#how-to-upload-a-model-by-url-eg-civitai" id="how-to-upload-a-model-by-url-eg-civitai"></a>

1. **On Thinkdiffusion, navigate to the appropriate folder, first.** Your uploads will be placed in that file path.

* For example, to upload a custom checkpoint model by URL, open your **My Files** panel, and navigate to the following folder:\
  *../user\_data/a1111/models/Stable-Diffusion/*

<figure><img src="https://learn.thinkdiffusion.com/content/images/2023/09/image-2.png" alt="" height="85" width="580"><figcaption></figcaption></figure>

* If you're uploading a custom LoRA, the path would would be: *../user\_data/a1111/models/Lora*

<figure><img src="https://learn.thinkdiffusion.com/content/images/2023/09/image.png" alt="" height="84" width="483"><figcaption></figcaption></figure>

**2. Click the ⬆️ Upload button** to reveal the upload field

<figure><img src="https://learn.thinkdiffusion.com/content/images/2023/09/image.jpeg" alt="" height="88" width="328"><figcaption></figcaption></figure>

**3. Paste in the URL** of your choosing. The URL can be from Civitai, huggingface, or any other URL hosting the files.

<figure><img src="https://learn.thinkdiffusion.com/content/images/2023/09/image-1.jpeg" alt="" height="120" width="1016"><figcaption></figcaption></figure>

**Find the correct link to right-click on Civitai:**

<figure><img src="https://learn.thinkdiffusion.com/content/images/2023/09/civitai-copy-rounded.png" alt="upload in progress, 0" height="300" width="850"><figcaption><p>Find the correct link to right-click on Civitai. You can also use the big download button on the top of the model's page, but when there are multiple files offered, you'll be able to choose individual files from this area.</p></figcaption></figure>

**Find the correct link to right-click on Huggingface:**

<figure><img src="https://learn.thinkdiffusion.com/content/images/2023/09/image-4.png" alt="" height="179" width="850"><figcaption><p>Find the correct link to right-click on Huggingface with the download icon, NOT the model's name. </p></figcaption></figure>
**4.** Hit the 🔄 **Refresh** button next to the appropriate models list (if applicable) and Voila! 🪄✨

***

## How to upload from Google Drive <a href="#how-to-upload-from-google-drive" id="how-to-upload-from-google-drive"></a>

Uploading files with a direct google drive link is as easy as pasting the URL of the file into the URL field.

\
It’s ***GETTING*** the link from Google that’s the tricky part, due to their security checks. In the future, we’ll be implementing a solution for this, and in the meantime you can take the steps below:

**⚡️Protip**: First confirm your file is publicly available with the link, so that "Anyone with the link" can access the file.

<figure><img src="https://learn.thinkdiffusion.com/content/images/2023/09/2023-09-22_9-11-37.png" alt="" height="262" width="541"><figcaption></figcaption></figure>

**1. "Copy link" from Google drive**

* It would look something like this: *<https://drive.google.com/file/d/1p66tMx0YhzXfzIxlupa8Oaqp-BJZA0Rf/view?usp=drive\\_link>*

**2. Convert the Google Drive public URL to a fully downloadable link**

* You can use the format:\
  *<https://drive.google.com/uc?export=download&id=YOUR_FILE_ID>*

**3. Replace “YOUR\_FILE\_ID” with the actual file ID** from your Google Drive URL.

* In this example, the file ID is *1p66tMx0YhzXfzIxlupa8Oaqp-BJZA0Rf*\
  so the fully downloadable link would be:\
  *<https://drive.google.com/uc?export=download&id=1p66tMx0YhzXfzIxlupa8Oaqp-BJZA0Rf>*

***

**Important**: If your file is too large, Google drive will present you with this confirmation:

<figure><img src="https://learn.thinkdiffusion.com/content/images/2023/08/image.jpeg" alt="" height="191" width="686"><figcaption></figcaption></figure>

You then need to follow these steps below to get the correct URL:

**1. Go to Inspect mode** with a right click & Inspect (or F12 button on Windows).

<figure><img src="https://learn.thinkdiffusion.com/content/images/2023/09/inspect.png" alt="" height="422" width="435"><figcaption></figcaption></figure>

**2. Select the Network tab**

**3**. **Click on the** "**Download anyway"** **button**, then click Cancel when the download window pops up.

**4. Click on the "uc?id=......"** in the Name column on the left.

**5. Click on the "Headers" Sub tab**

**6. Copy the Request URL**\
( which you can find in the: *Network Tab > Headers Sub tab > Request URL )*

The Request URL is the fully downloadable URL to your file. Now you can *FINALLY* paste *THAT* into the Think Diffusion Upload via URL field!

<figure><img src="https://learn.thinkdiffusion.com/content/images/2023/09/google-drive2.jpg" alt="" height="1200" width="1400"><figcaption></figcaption></figure>

***

## How to add persistent models in ComfyUI <a href="#how-to-add-persistent-models-in-comfyui" id="how-to-add-persistent-models-in-comfyui"></a>

\
Models added through the manager are not retained between sessions. This section outlines how to incorporate various types of models to ensure they persist across different machine sessions.

Here are some typical directories for uploading models and their corresponding mappings:

* **Embeddings** - Embeddings can be downloaded and placed under `comfyui/models/embeddings` e.g. - [Useful Quality Embeddings](https://civitai.com/search/models?sortBy=models_v8\&query=embeddings)
* **Checkpoints** - One can download there checkpoints models and place it under `comfyui/models/checkpoints`\
  e.g. [JuggernautXL](https://civitai.com/models/133005/juggernaut-xl)
* **Clip\_vison** - Download your clip vision model and put it under `comfyui/models/clip_vision`\
  e.g. [IPAdapter Models](https://huggingface.co/h94/IP-Adapter/tree/main)
* **ControlNets** - Download your checkpoint model and put it under `comfyui/models/ControlNet`\
  e.g. [Controlnet on huggingface](https://huggingface.co/lllyasviel/ControlNet-v1-1/tree/main)
* **Lora** - All the LORA or motion-LORA models must be under `comfyui/models/loras`\
  e.g. [Loras on Civitai](https://civitai.com/search/models?sortBy=models_v8\&query=lora)
* **VAE** - Download your VAE and place it under comfyui/models/VAE\
  e.g. [Vae on CivitAI](https://civitai.com/search/models?sortBy=models_v8\&query=vae)
* **LyCORIS** - Download your LyCORIS model and place it under `comfyui/models/LyCORIS`\
  e.g. [Lycoris models on CivitAI](https://civitai.com/search/models?sortBy=models_v8\&query=Lycoris)
* **ESRGAN** - One can download any upscaler model (esrgan) and place it under `comfyui/models/ESRGAN`\
  e.g. [Ultimate ESRGAN Upscalers](https://civitai.com/models/147838/ultimate-esrgan-upscalers-collection-bundle-aio)

<br>


# Pre-installed Models / Nodes / Extensions


# Admin & Billing

**What’s the hourly rate policy?**

* Pay-as-you-go. You’re charged only for the duration used. Any unused portion is refunded when the machine stops.
* **"Is TD-Pro a one-time fee or subscription?"**
  * It’s a $19.99/month subscription. You still pay machine usage on top of that.
* **"What does TD-Pro give me?"**
  * 200GB persistent storage
  * 20% discount on machine rates
  * $10 in monthly credit
  * Ability to use 24/7 file browser without launching a machine
* **"Do I pay the hourly rate in addition to the Pro fee?"**
  * Yes. You’re charged for actual usage on top of the monthly fee. The $10 credit offsets part of it.

##

## How to find an invoice?

<figure><img src="/files/DU0ekUjDTXSywNFRvAiq" alt=""><figcaption></figcaption></figure>

***

## How to add funds in advance?

<figure><img src="/files/Pc4Dt843W2uAkbBSZScb" alt=""><figcaption></figcaption></figure>


# How to contact support

1. Our official channel is [Discord help\_desk](https://discord.com/invite/hAm87ApunD) channel as discussions are more fluid and better tracked there.
   1. feel free to search on key words there to see if the issue was addressed before
   2. of course, you can just post a new question
2. Good info to have on hand as we may ask for it
   1. The app: i.e. Automatic1111, ComfyUI, etc.
   2. The ThinkDiffusion machine version: i.e. Current, Beta, Previous, etc.
   3. The machine speed/size: ie. Quick, Turbo, Ultra
   4. The log file.
      1. if providing the log file on a public channel (not a private DM), rename it to remove the machineId
   5. If it is an issue with generating,
      1. Description of what you are trying to do and the expected output/result.
         1. if you are following a tutorial or something from the internet, the url
      2. If using ComfyUI, a copy the workflow json
      3. Screenshots are really helpful
      4. Any input files (i.e. image/video) that would help us reproduce and test
   6. We may ask for you account email or machineId/URL, but only provide these in Direct Messages (DMs) and not public channels.
3. If you are unable to use Discord, you can reach out to us by email at <support@thinkdiffusion.com>


# Page 5


# ThinkDiffusion FAQs

## Getting Started

<details>

<summary>What is ThinkDiffusion and how does it help me create AI Art?</summary>

ThinkDiffusion allows users to launch virtual machines with selected open-source apps. Users can use models from anywhere on the internet, such as Hugging Face, Civitai, or their own models. They can also install any extensions for Automatic1111 and custom nodes for ComfyUI. A ThinkDiffusion virtual machine works just like a personal computer.

</details>

## Security & Privacy

<details>

<summary>How does ThinkDiffusion handle data privacy and security?</summary>

ThinkDiffusion ensures that each machine and workspace is 100% private. Your data is never shared publicly, and you have complete control over your environment. We store user data securely with a top-tier Fortune 50 global provider, ensuring robust security and reliability.

</details>

## Features & Applications

<details>

<summary>What applications are included in the ThinkDiffusion platform?</summary>

ThinkDiffusion includes more than 10 cutting-edge applications for Stable Diffusion and other image and video models.\ <br>

* **Automatic1111** – A comprehensive UI for all Stable Diffusion features.
* **Forge** – A faster and more frequently updated fork of Automatic1111.
* **ComfyUI** – A workflow/node-based interface for advanced AI workflows.
* **Kohya** – A dedicated UI for model training and fine-tuning.
* **Fooocus** – Simplifies AI art generation with user-friendly controls.
* **And More** – Access additional open-source apps and the latest experimental tools.

</details>

<details>

<summary>Can I access custom models and extensions on ThinkDiffusion?</summary>

Yes. ThinkDiffusion offers open access to models from Civitai, Hugging Face, and other open-source repositories. Users can upload their own models and install custom extensions for Automatic1111 and custom nodes for ComfyUI. You can do anything on ThinkDiffusion that you could as if you setup the open-source apps locally on your own computer.

</details>

<details>

<summary>How does ThinkDiffusion handle updates and new model releases?</summary>

We regularly update all the open source apps to support the latest workflows and new model releases. From the time of release of a new popular model to when these apps are updated could be as quick as 48 hours. Note that, in many cases, we don’t need to update our platform for new models, as users can simply upload and use them as soon as they are created.

</details>

<details>

<summary>What models and checkpoints are available?</summary>

The machines are like your local computer that you don't have to manage - so any open source model from Hugging face, Civitai, or your own local models are all usable.

</details>

<details>

<summary>Are there any restrictions on the available models? Can teams upload and train their own LoRAs?</summary>

No restrictions. It is your own virtual computer. You can train LoRAs (and other types of models) and then upload the LoRAs to use on ThinkDiffusion.

</details>

<details>

<summary>How does ThinkDiffusion handle session persistence (e.g., saved workflows, ongoing projects)?</summary>

All files, customizations, installed nodes, extensions, everything is persistent as long as you have an active TD-Pro or TD-Teams subscription. Note that your files will automatically be deleted within 48 hours of an expired subscription.

</details>

<details>

<summary>Does Think Diffusion support direct export to other creative tools like Adobe Suite, DaVinci Resolve, Capture One, etc.?</summary>

No, there is no integration to these other tools. However, there may be opensource extensions for Automatic1111, Forge or custom nodes for ComfyUI that can achieve the desired effect of generating outputs that can be used in other closed source tools.

</details>

<details>

<summary>Does Think Diffusion plan to support multimodal AI tools in the future (e.g., video generation, 3D, music AI, etc.)?</summary>

Video, 3D and music are already offered on ThinkDiffusion through various apps and workflows on those apps such as ComfyUI.

</details>

## Collaboration & Workspace Management for TD-Teams

<details>

<summary>How does ThinkDiffusion enhance creative collaboration?</summary>

Every workspace can have custom nodes, installed extensions, and shared models that remain persistent. When a team member installs a custom AI model, workflow, or extension, it becomes available to all users within that workspace, ensuring a consistent and collaborative environment.

</details>

<details>

<summary>How are individual team member accounts managed? (SSO, email-based, etc.)</summary>

When you create an Admin account, you can use your email and password, and invite individuals via their emails. Admins centrally manage billings and can also set limits for each team member’s monthly max usage.

</details>

<details>

<summary>How does Thinkdiffusion handle simultaneous usage for multiple team members?</summary>

ThinkDiffusion is highly scalable, and each team member can launch one or more dedicated virtual machines simultaneously.

</details>

<details>

<summary>Can team members choose different UIs (e.g., Automatic1111, ComfyUI, Fooocus), or is access limited?</summary>

Yes, team members can launch any number of apps including those listed as well as others like Kohya, Forge, Live Portrait, AudioWeb, FaceFusion, Swarm, Diffusion Pipe, and more.

</details>

<details>

<summary>Can I belong to multiple teams?</summary>

Yes, you can be a part of multiple TD-Teams AI workspaces and switch between them using the profile drawer.

</details>

<details>

<summary>Are there role-based permissions (e.g., different access levels for team members)?</summary>

Yes, admins can manage the account, handle billing, add and remove users, set usage limits, and create new workspaces.

</details>

<details>

<summary>How do I add and manage team members?</summary>

Team Admins can create any number of workspaces, each fully isolated to keep projects and clients separate. Team Admins can invite any team member to each workspace. Team Admins can set usage limits for each team member. This is perfect for larger teams or classes that need controlled access.

</details>

<details>

<summary>Can I access my files without launching an AI machine?</summary>

Yes. TD-Teams includes the 24/7 file browser, allowing access to files anytime without additional cost, even when no GPU is running.

</details>

<details>

<summary>How do I launch and manage machines within a workspace?</summary>

Click on a workspace to enter it. All GPU machines launched within that workspace will remain associated with it.

</details>

<details>

<summary>Are there time limits per user session, or can members work as long as needed?</summary>

No limits. There is an autostop timer that can be set as a safety to ensure the machines do not run on forever. Admins can also set usage caps for users.

</details>

<details>

<summary>What happens if the team expands - is it easy to scale up?</summary>

It is as easy as adding more individuals to the account.

</details>


# IC-Light in the Cloud


# How To Access Logs In ThinkDiffusion

If your workflow is taking a while, and you’re not sure if it’s still running or stuck, check the Logs file. They’re especially helpful for debugging or following complex workflows.

{% hint style="info" %}
💡 Under each app folder is a `logs` folder. Inside that folder, you’ll find a log file that matches the machine ID in your URL. So for comfyui it will be under the `/comfyui/logs/` folder.
{% endhint %}

<figure><img src="/files/PbFbuWCawJVKtJ1yPyrp" alt=""><figcaption><p>How To Access Logs In ThinkDiffusion</p></figcaption></figure>

Curious what’s going on in the terminal as you’re working?

Every time you launch a machine, it's assigned a distinct name, and a related log file is created for it inside the corresponding app folder. For instance, a log file might be named *phu-attention-23213812-logs.txt.*<br>

* Simply navigate to *a1111/logs*, *comfyui/logs,* *fooocus/logs, or kohya/logs.*
* Click on the *\<machine\_name>.txt* file.
* The latest log file will open in a new tab.&#x20;
* ***Refresh*** your browser to get the latest status in real-time!<br>

***

If you're still confused about an issue, feel free to reach out to our support team on the ThinkDiffusion[ Discord here](https://discord.com/invite/hAm87ApunD). Don't forget to attach the `logs file` as it helps them resolve your query much faster.

**Step-by-step breakdown of how to access Logs on ThinkDiffusion**

1. Navigate to your apps file browser and click on app name, for example - "comfyui"

<div align="left" data-full-width="false"><figure><img src="/files/a6XBiKlx33NNFxnJKkoY" alt=""><figcaption></figcaption></figure></div>

2. Navigate to the logs folder within the app folder<br>

   <figure><img src="/files/QMNDHXwpuZr4914TiV0a" alt=""><figcaption></figcaption></figure>
3. Each `log file` has a name convention based on `user-workflow` and a `timestamp` to help you identify the correct logs.&#x20;

<figure><img src="/files/aIZftJOPBSO9SK1X0wwS" alt=""><figcaption></figcaption></figure>


# My ComfyUI workflow is failing. How do I fix it?

If your ComfyUI workflow isn’t producing any output, or nothing seems to happen after you hit “Queue Prompt,” this guide will help you debug the issue.

First off, just being real, loading giant workflows with tons of custom nodes and unknown models can be tricky. If you’re just getting started, try one of the [pre-loaded workflows](https://learn.thinkdiffusion.com/) from our collection first. It’s way faster and helps you confirm everything’s working.

Still want to load your own? No problem. Here’s how to do it right.

\
**Download the workflow file and drag & drop it into your ComfyUI window.**

<figure><img src="/files/aV8EPdTmw3z7rTA7M3rO" alt=""><figcaption><p><strong>Download the workflow file and drag &#x26; drop it into your ComfyUI window.</strong></p></figcaption></figure>

<br>

### 1. Check your machine and app version

Some workflows require more memory or a specific version of ComfyUI/other apps to run correctly. If the workflow silently fails, this could be a potential reason.<br>

* If you're using a workflow from GitHub or CivitAI, check if it mentions:
  * Required ComfyUI or app version
  * Specific machine sizes needed for the workflow
* Map the app versions you need with the app versions on ThinkDiffusion:

<figure><img src="/files/G13IXXYOpp7jOqtmJhKb" alt=""><figcaption><p>Map the app versions you need with the versions on ThinkDiffusion:</p></figcaption></figure>

* Ensure that you're using the correct machine size you need:

<figure><img src="/files/T4UgjlLgY96Nd1fpPhzM" alt=""><figcaption><p>Ensure that you're using the correct machine size you need</p></figcaption></figure>

***

### 2. Install Missing Custom Nodes

Workflows built with custom nodes need those nodes installed. If the workflow refers to a node that doesn’t exist, ComfyUI will quietly break or fail to load.

*If you see red nodes in your workflow, you need to install missing custom nodes:*

1. Go to ComfyUI Manager
2. Click "Install Missing Custom Nodes"
3. Select and install all missing nodes from the list

<figure><img src="/files/PqqGQytSkk0dcXoUQPy3" alt=""><figcaption><p><em>If you see red nodes in your workflow, you need to install missing custom nodes</em></p></figcaption></figure>

<figure><img src="/files/LVAkEmnqfLM8jdNc2gMU" alt=""><figcaption></figcaption></figure>

***

### 3. Install Missing Models&#x20;

***

### 4. Bad custom nodes

Bad custom nodes and too many nodes cause launch issues. For Comfy, bad extensions usually don’t crash the app - they just don’t get loaded. But in A1111, a bad extension can break launch entirely. You have to delete or remove it.

***

### Check the logs | How To Access Logs In ThinkDiffusion

&#x20;*If your workflow is taking a while, and you’re not sure if it’s still running or stuck, check the **Logs*** ***file**. They’re especially helpful for complex workflows.*

**How to access app logs in ThinkDiffusion?**

{% hint style="info" %}
💡Under each app folder is a `logs` folder. Inside that folder, you’ll find a log file that matches the machine ID in your URL. So for comfyui it will be under the `/comfyui/logs/` folder.
{% endhint %}

<figure><img src="/files/PbFbuWCawJVKtJ1yPyrp" alt=""><figcaption></figcaption></figure>

If you're still confused, feel free to reach out to our support team on the ThinkDiffusion[ Discord here](https://discord.com/invite/hAm87ApunD). Don't forget to attach the `logs file` as it helps them resolve your query much faster.&#x20;

\
**Other resources:**

*


# Troubleshooting FAQs

<details>

<summary>Machine stuck on the “skeleton” screen (UI not loading)</summary>

If you see the file browser isn’t showing files, just skeleton placeholders - it’s not communicating with the server. There’s a good chance the server has crashed.

</details>

<br>


# Machine stuck on the “skeleton” screen (UI not loading)

If you see the file browser isn’t showing files, just skeleton placeholders - it’s not communicating with the server. There’s a good chance the server has crashed.


# Failing to launch – Bad custom nodes


# Page 1


# EDU / Teams Commonly Asked

This guide is designed to help TD-Teams and TD-EDU users deliver the best experience for sessions, classes, and training events. It covers onboarding, key links, do’s and don’ts, setting up workflows, and common issues to ensure smooth operation.

#### **ThinkDiffusion Self-Onboarding & Pricing Links:** <a href="#thinkdiffusion-self-onboarding-pricing-links" id="thinkdiffusion-self-onboarding-pricing-links"></a>

**For TD-EDU**

* Onboarding Link:[ Set up your TD-EDU Account](https://learn.thinkdiffusion.com/your-td-edu-account/)
* Pricing Link:[ View TD-EDU Pricing](https://www.thinkdiffusion.com/edu#teams)

**For TD-Teams**

* Onboarding Link:[ Set up your TD-Teams Account](https://learn.thinkdiffusion.com/your-td-teams-account/)
* Pricing Link:[ View TD-Teams Pricing](https://www.thinkdiffusion.com/teams#teams)

***

#### **Ensuring Sufficient Funds for Large Classes** <a href="#ensuring-sufficient-funds-for-large-classes" id="ensuring-sufficient-funds-for-large-classes"></a>

If you’re planning to run a large class with, say, **50 students**, make sure to **add sufficient funds to your team account** so that all **50 students have enough credits to launch machines** without interruptions.

**Here’s why this is important:**

* **When a student launches a machine**, the system **pre-debits the funds** from your total team balance to secure enough resources for the machine's runtime.
* If your team balance **doesn’t have enough funds**, students will face issues launching their machines — even if they haven’t consumed their full usage yet.
* For example, if each student requires **$10 worth of credits** to launch a machine, you’ll need at least **$500 pre-loaded** to ensure everyone can start simultaneously.

**To avoid this, you can:**

1. **Pre-load sufficient funds** in your account before class starts.
2. Monitor usage under **Manage Teams > Set Members Limit** to ensure fair usage.
3. If a student runs into credit issues, you can **manually increase their limit** or add more funds during the class.

***

#### **Setup Credit Spend for Each Student:** <a href="#setup-credit-spend-for-each-student" id="setup-credit-spend-for-each-student"></a>

To prevent abuse or accidental overuse, you can set individual monthly usage limits for each student or workspace member.

If this setting is **OFF**, users will have unrestricted access to the total credits available in your account.

**To set limits:**

In your Team Members section, click "*Set Member Limits*"

<figure><img src="https://lh7-rt.googleusercontent.com/docsz/AD_4nXcIn2vKEAq7eDNnzrCauu_v7BGfBnXc-oNNl_xWChoxsP7-H98i-a0cGzkz-g9LzTXhgFe7yn4L-mdU6cZddsNpB8d5imwCv5JWhtRtySF3kYs_puEThWJ33vfcBqFMy3Z0pgwL?key=uCnGXbOFNmqrpko_ecY6fOH5" alt="" height="197" width="624"><figcaption></figcaption></figure>

Toggle the setting to "On" and you can set limits individually or set a standard amount for everyone by clicking the checkboxes for the corresponding students.

<figure><img src="https://lh7-rt.googleusercontent.com/docsz/AD_4nXftu_ZJVV-vAKba7UIc2JFCdqWrgybSQFC4SqhfrY1wuRUaMIrHEdFahDDEbb5EYU7qOXHvU7T7MNUnU9-nzAtHnCNSc7eqwpAydad9L0VrMmwaIV-1H_aP3vi1UkFuF_sfDwCx5g?key=uCnGXbOFNmqrpko_ecY6fOH5" alt="" height="386" width="751"><figcaption></figcaption></figure>

<figure><img src="https://lh7-rt.googleusercontent.com/docsz/AD_4nXc8B_9gl5VNmrOPg56YPSKtBNDFHui4V6WmFDTityuPbeBt2y49ZbUcofwCy170KICVXKGRIO01rx4fzFdvkXkerX3tnzFba8wKb3vkWJDgO5uaGSpmmgX7pqhxo0ZEBCzMmDbnsw?key=uCnGXbOFNmqrpko_ecY6fOH5" alt="" height="385" width="624"><figcaption></figcaption></figure>

You can set the limit one by one for each student.

For convenience, you can apply the same monthly limit to all selected users using the **Monthly Limit Amount** setting.

<figure><img src="https://lh7-rt.googleusercontent.com/docsz/AD_4nXdYSIqMtUeEIY6Nmx_lP5DfzFOURqluA_nsy6dknKEKCTKOxkiupm7mK9C66zoTEHSwzEKXwattFcAJEqTnLXZHKK_TVzEvVcwYwSdOLJ_hVprW5hmREqyB7f_gXG9ei9bzTZeI6w?key=uCnGXbOFNmqrpko_ecY6fOH5" alt="" height="233" width="616"><figcaption></figcaption></figure>

***

**Setting Up for a Smooth Class: Best Practices & Support**

**1. Pre-Prepare Workflows in Advance**

To ensure a seamless experience for your students, set up your workflows at least a week before your class. Instructors are often busy with last-minute logistics, and the more workflows you have, the more time you'll need to configure them properly on ThinkDiffusion. Some workflows may be incompatible with others or become outdated, so early preparation helps avoid disruptions. We highly recommend a quick **20–30 min pre-test** with our **TD-Support team**.

**Pre-Preparation Checklist:**

* Install any custom nodes required for your workflows.
* Install all necessary models.
* If a custom node or model isn’t working as expected, contact TD Support immediately via your assigned support channel, i.e **Discord**.

***

**2. Get Your Students Logged In Before the Class**

To avoid delays during the session, ensure all your students have successfully logged into **ThinkDiffusion** ahead of time. This helps prevent any technical hiccups during the class.

**Important Note:**&#x57;e do **not** automatically notify individuals you add to your account to prevent issues like mistyped email addresses causing spam or security risks.

* Once you’ve added your team members, you’ll need to send them a personal email with one of the **PDF instructions** provided below to guide them through the login process. Once they sign up, they’ll automatically gain access to your workspace.
* Additionally, please ensure your **workspace has sufficient funds loaded** to allow each student’s machine to launch seamlessly. Running out of credits mid-session can disrupt the learning experience.

[***PDF for school accounts running on Google email systems***](https://learn.thinkdiffusion.com/content/files/2025/01/ThinkDiffusion-SignUp-EDU-2024-GoogleSystem.pdf)

[***PDF for school accounts running on NON-Google email systems***](https://learn.thinkdiffusion.com/content/files/2025/01/ThinkDiffusion-SignUp-EDU-2024-NonGoogle.pdf)

***

&#x20;**3. Leverage TD Support**

Stay in close communication with the TD Support team throughout your setup process and during the class. Your onboarding should include access to a dedicated Discord chat for quick assistance.

***

**4. Notify TD for Scheduled Events**

For scheduled training sessions or classes, inform the TD team at least one day in advance. This allows us to:

* Ensure machine availability for your session.
* Optimize file system performance for multi-user workflows.
* Arrange high-performance compute machines and pre-warm them for instant launch.

***

**5. On-Demand Priority Support**

If you need real-time technical support during a session, coordinate with your TD advisor to have a dedicated support team available. This ensures any unexpected issues can be resolved immediately.

By following these steps, you'll create a smoother experience for both yourself and your students while maximizing the performance of ThinkDiffusion.

***

#### **🚫 Don’ts (Follow These for a Smoother Experience)** <a href="#f0-9f-9a-ab-don-e2-80-99ts-follow-these-for-a-smoother-experience" id="f0-9f-9a-ab-don-e2-80-99ts-follow-these-for-a-smoother-experience"></a>

When working on ThinkDiffusion machines, keep in mind that setting up the environment is slightly different from a local PC. To avoid issues, follow these guidelines:

**ComfyUI Manager**

All TD machines come with **ComfyUI Manager pre-installed** - there’s no need to reinstall it. Doing so can cause machine failures. Since ThinkDiffusion runs in a cloud environment and users don’t have CLI access, we preload the manager to ensure stability.

**Adblocker Issues**

Using an ad blocker **can interfere with system requests**, leading to frequent disconnects and errors. If you experience connection issues, try **disabling your ad blocker**.

**Avoid Unnecessary Custom Node Installations**

Each installed node **adds to your launch time**. If you have **over 30 nodes**, your machine may take **5+ minutes to start** or even fail. Remove any **unused or outdated custom nodes** to keep things running smoothly.

**Running Advanced Workflows on Lower-End Machines:**

**Some workflows (e.g., Flux, Hunyuan, LTX, Flux Lora, WAN, SkyReels, or other complex video workflows)** require substantial **GPU resources** and may fail with **Out-of-Memory (OOM)** errors if you're not using a sufficiently high-end machine. For these workflows, use an **Ultra Machine** to ensure adequate VRAM and performance.

**Uploading Large Files (Over 2GB)**

If you’re on a **Workspace or Team account**, use the **24/7 file browser** for files over 2GB. This lets you manage files **without launching a machine**, saving credits and reducing downtime.

Following these best practices will help you get the most out of ThinkDiffusion while avoiding unnecessary disruptions.

<figure><img src="https://lh7-rt.googleusercontent.com/docsz/AD_4nXcZ7KQKfuw1OvS88ltWLLXhpdi9UTET8ZXSyZ5Q3l7LKbD_-WkJ9IRm4n6bsWkRiGfUBZ7OAqW2dYBSYaC54C8aLR3MdnLG3lYa_o6j4qnaNG7zm1np-cbUPJamIrmy5W_J8JSbPA?key=uCnGXbOFNmqrpko_ecY6fOH5" alt="" height="65" width="387"><figcaption></figcaption></figure>

#### **Support for Newer Workflows** <a href="#support-for-newer-workflows" id="support-for-newer-workflows"></a>

ThinkDiffusion offers multiple versions of each app to ensure compatibility with different workflows, custom nodes, and models. These versions vary in stability and feature support, giving users flexibility based on their needs.

<figure><img src="https://lh7-rt.googleusercontent.com/docsz/AD_4nXfp1h02PcIQDGWDMuKMVWRrZDC1kTKnqVkwZhQE2gJ8QBSyabW9O3DeU_llRoMZlc9K2Q6nePYNulJJBMvMCcZvPG2dCemgK48vuWxqALmUsWIsEef8dLmsmtKaeJoijvlEe-9z?key=uCnGXbOFNmqrpko_ecY6fOH5" alt="" height="352" width="591"><figcaption></figcaption></figure>

**Available Versions on ThinkDiffusion:**

* **Beta:** The latest version, often based on the most recent commit from the official repo. Supports the newest custom nodes, workflows, and models but may have some instability.
* **Current:** The stable release, typically two weeks to a few months old. Recommended for users who want a balance of stability and newer features.
* **Previous:** A stable version, usually older than four months. Best for workflows that rely on older models or legacy custom nodes.

Each version comes with supporting notes to help you choose the right one for your workflow.

***

#### **Common Issues** <a href="#common-issues" id="common-issues"></a>

**Machine Failed to Launch:**&#x20;

There can be multiple reasons for launch failures.

**Import failed on custom node**

* Check logs for the recently failed machine using the 24x7 file browser.

<figure><img src="https://lh7-rt.googleusercontent.com/docsz/AD_4nXeuVy9apAR9AokA6Jc3gnItPlEIA_zgQ4GJSZvGP80Vth87HtoFl7RwHfvV7JwS4uH3GtShxorUYRr04whu3xGFDS4kHwnPbcPA4cMCNP3FQ7DUQXFwoIfJXQQchMOJgAwVCCmP?key=uCnGXbOFNmqrpko_ecY6fOH5" alt="" height="93" width="440"><figcaption></figcaption></figure>

* Navigate to ***comfyui/logs*** and open the latest failed machine log file.

<figure><img src="https://lh7-rt.googleusercontent.com/docsz/AD_4nXflmGvi1r4tPKB9Jbp9puFw_OZC5-lbhJEWwNhZNpJG8kOAF9QovCJtyrxGFBsrjavcwPpkn0DQtWA7peJj7UM4492X8Fe0yVjHPaAyLyIw4J4bsWxhJFOmJPXS8lOmHVG54-dn?key=uCnGXbOFNmqrpko_ecY6fOH5" alt="" height="160" width="503"><figcaption></figcaption></figure>

* Look for errors related to custom nodes or "Import Failed."

<figure><img src="https://lh7-rt.googleusercontent.com/docsz/AD_4nXeUc9-Y14M2npVfDGN1r20v6-AvdESB23pk-JigehokkDk24yepXtYDW5ik8TMPUO7ZvZR6RC6q4Zhuwtbaq-R0Nzze9kjR2JDIU9z6uZGz-r_dg33jh3mP5vZFNBD6JP0EgNlo?key=uCnGXbOFNmqrpko_ecY6fOH5" alt="" height="80" width="536"><figcaption></figcaption></figure>

* Remove the failing custom nodes from ***comfyui/custom\_nodes*** and restart your session by launching a new machine.

***

**Machine Took More Than 7 Minutes to Launch and Failed Without Errors in Logs:**

* If no errors are found in the logs but the machine failed on launch, the issue could be slow loading.
* If you have more than 50 custom nodes, loading all nodes can be time-consuming.
* In ThinkDiffusion, any launch exceeding **10 minutes** is marked as failed.
  * **Solution:** *Go to **comfyui/custom\_nodes** and remove unnecessary custom nodes.*

***

**Machine failed for unknown reason**

* If neither of the above solutions work, you can reset your ComfyUI or A1111 environment from the **Profile Menu**.
* Click on **Profile** > Locate **Reset to Defaults** > Click on ***Comfy/A1111*****&#x20;Reset**.
* This will clean only custom nodes/extensions while keeping your models and output files intact.

<figure><img src="https://lh7-rt.googleusercontent.com/docsz/AD_4nXfik5DTwmOvsfKPC3itenKpBnC4CBgCDjv7vhGay0987-ZhNFlV9d2ucjb0yBp7Q4POTsxCeQXm5lenVEZVb6wRk75T8HCPr2VLFVbUkV74sx6ao_FLjkbZDgNN1_ZyE9cuHXDgPA?key=uCnGXbOFNmqrpko_ecY6fOH5" alt="" height="260" width="172"><figcaption></figcaption></figure>

***

**File Browser Not Working:** There can be multiple reasons for file browser failures.

<figure><img src="https://lh7-rt.googleusercontent.com/docsz/AD_4nXfCrH2TmceSoPhyXe3IupUaLtCRE-oFXta1yjQeQ30DyrUt4amYbqjeASLp37vGCyrEALNloAsJGWPYkS_svT8kcKUrBV8MJ-Tr8c8Hesg20afMNpRgFm46PxGUkPfSunJ83zcvhQ?key=uCnGXbOFNmqrpko_ecY6fOH5" alt="" height="376" width="255"><figcaption></figcaption></figure>

***

**Machine is in an Out-of-Memory (OOM) State**

* Some workflows may consume excessive memory, causing the machine to crash and making the file browser unresponsive.
* **Solution:** Upgrade to a higher-tier machine like **ULTRA** to run your workflow.

***

**File Browser Still Not Working After Relaunch**

* This can be due to a **dependency conflict** caused by a custom node.
* Example: Some older custom nodes may require outdated dependencies (e.g., typing package), leading to file browser failure.

***If the issue persists, contact Support (Discord) for further assistance.***

***

**Custom Node Import Failed**

<figure><img src="https://lh7-rt.googleusercontent.com/docsz/AD_4nXd1oyCd8_Wb3OV7shFbvqvUyOJ6OfpbAt4m5tdWbl_QmTpeZg6aQfmkMuQElzPP2I-9cjU-V4FG_ch5fXE0xtgudsrtjEJsNZlPubamy6RGPrbaUZVKSNTQYFd1ToZuPCPqZTo?key=uCnGXbOFNmqrpko_ecY6fOH5" alt="" height="93" width="624"><figcaption></figcaption></figure>

Some custom nodes may have **dependency conflicts** or require additional Python packages.

**Solution:**

1. Open **Manager** > Locate the failing custom node.
2. Click **Try Update**.
3. Restart **ComfyUI**.
4. If the issue persists, contact **Support** for assistance.

***

**ComfyUI Reconnecting/Disconnected**

Possible Causes & Solutions:

* **Adblocker:** Disable any ad blockers and refresh your browser.
* **Out of Memory (OOM) Exception:** If ComfyUI is unresponsive, try using the queue feature or restart your session.
* **Installing a Custom Node or ComfyUI Restarting:** Wait a few minutes before relaunching the session.

***

**ComfyUI Grey/White Screen**

**Solutions:**

1. Refresh the browser or reload the page.
2. Switch to a different network.
3. If the issue persists, contact **Support**.

***

**Uploaded Model Not Visible**

* If you uploaded a model but cannot see it under the custom node:&#x20;
  * Verify that the file size matches the original source and that the download has fully completed.
  * Refresh your browser. ComfyUI does not automatically update the list of models and custom nodes.

***

**Not able to download gated/restricted models**

* Contact the **Support Team** to assist with downloading restricted models within your workspace.

***

**Generation stuck or cancelled**

<figure><img src="https://lh7-rt.googleusercontent.com/docsz/AD_4nXcg52Xh59nJ4huFhpUlv6iXVIsG_zxv6_ByXhmfHUq-s8AFYwcLL71Mpk-4Zl3uoHTM2h410qQylomo3q-l45q9NRynrRAxAHwnhzth7xPui3LoM4XO3FtS9J7nZLD7i8kqkyhTig?key=uCnGXbOFNmqrpko_ecY6fOH5" alt="" height="355" width="589"><figcaption></figcaption></figure>

**Possible Causes & Solutions:**

1. **Failure on Nodes or Missing Config/Files:**
   * Check the node with a red border.
   * Ensure all required models are selected.
   * If the node requires input (image/video), provide the necessary file.
   * Verify that input/output connections are correctly linked.
2. **Out of VRAM/Memory:**
   * Try launching an ULTRA machine.
   * If the issue persists, contact Support.
3. **Unknown Error:**
   * Check logs under comfyui/logs for the root cause.
   * If unresolved, contact **Support**.

***

**Node Not Found in Manager:** Sometimes, the preloaded manager may not be fully synced with the upstream ComfyUI Manager Repository:&#x20;

**Solution:**

* Open ComfyUI Manager > Click Install via Git URL.

<figure><img src="https://lh7-rt.googleusercontent.com/docsz/AD_4nXfJViPEW6o0lnqoo_lKgsk410DQel-uDTEX6GWbkYBbxxaUx2xrMvxfZiNLjIZ21GYaulc2W4aGHzt5ulUrjnlAYyTB14RnE6PylGuAUBnEjIdg3hipu9jCpn1zXiTkbILD2Tnt0A?key=uCnGXbOFNmqrpko_ecY6fOH5" alt="" height="329" width="576"><figcaption></figcaption></figure>

* Enter the GitHub URL of the custom node in the popup.

<figure><img src="https://lh7-rt.googleusercontent.com/docsz/AD_4nXdbPr5GIEQL49RlxoP3L_sZCEIugH1ZhZoFXNx1db7IPYJ1lp5PuUs7rg7d6azFY9Behnco9TnXd6uTxsLbRag3JvHlWoiNEfJqydhAHSx8iGYF3CI4T4MjuDVmKwPuXYBFJmwQMQ?key=uCnGXbOFNmqrpko_ecY6fOH5" alt="" height="198" width="445"><figcaption></figcaption></figure>

* Click OK and wait for the installation to complete.

<figure><img src="https://lh7-rt.googleusercontent.com/docsz/AD_4nXfffAeUcYu0Y-6hEd08wYbzNswVV0kvewiQN8dqmsBR8qzxQ-W-395vPnxuGzPrvRD06VSH4HE0Dbt_PUCsLhl9l4fBPIwfV9fWE6n3G91hG0mkodqcPc-IVFJ1lwji8uD3ZYJBgA?key=uCnGXbOFNmqrpko_ecY6fOH5" alt="" height="180" width="560"><figcaption></figcaption></figure>

* Once installed, click restart.

<figure><img src="https://lh7-rt.googleusercontent.com/docsz/AD_4nXcbbkOLqTdbGX8Sxo1qnP9CpyLbaTFHJYccBzzil0tk9eZeMnlalKau5xFaoAyIzxkhWpkA6urbj5s-EbVqQiea9YcFlzXk2H4h4AegCYVccA2eFRmHTh4uY_2jQxhWXEpbizTuWQ?key=uCnGXbOFNmqrpko_ecY6fOH5" alt="" height="191" width="553"><figcaption></figcaption></figure>

If the installation fails, reach out to **Support** on [**Discord**](https://discord.gg/hAm87ApunD) for further assistance.

Share:<a href="https://twitter.com/intent/tweet?text=EDU%20%2F%20Teams%20Troubleshooting&#x26;url=https://learn.thinkdiffusion.com/edu-teams-troubleshooting/" class="button secondary"></a><a href="https://www.facebook.com/sharer.php?u=https://learn.thinkdiffusion.com/edu-teams-troubleshooting/" class="button secondary"></a><a href="https://www.linkedin.com/shareArticle?mini=true&#x26;url=https://learn.thinkdiffusion.com/edu-teams-troubleshooting/&#x26;title=EDU%20%2F%20Teams%20Troubleshooting&#x26;source=ThinkDiffusion" class="button secondary"></a><a href="mailto:?subject=EDU%20%2F%20Teams%20Troubleshooting&#x26;body=https://learn.thinkdiffusion.com/edu-teams-troubleshooting/" class="button secondary"></a><br>


# Page 4